
Dynamics 365 - Custom Dialogs in UCI - Part 3
You may wonder why is this part 3 when there is no part 1 and part 2. The reason is simple. Bob Guidinger already covered the introduction to the custom dialogs well enough and you can read about it here in his blog post. Please, do so, I’m going to refer to it quite often.
When I was reading the post, I immediately wanted to try it out in my own environment. However, the blog post doesn’t cover much about more complex ways of using custom dialogs. So I decided to deep dive into this topic.
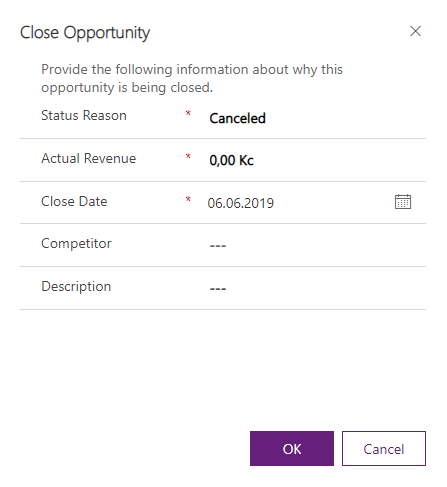
I gave myself a task to create custom dialog replicating the one that shows up when user wants to close an opportunity as lost.
I started by making custom Customizations.xml file, where I defined the custom dialog, inside the “Dialogs” element. If you don’t know how to do it, you can follow the instructions in Bob’s blog post.
After that, I added the first field, which is the Status Reason field. It’s an OptionSet data type field, which is defined by a global option set. Note that you cannot use already existing fields, you have to always create new field and set the values equal to the existing field.
</tabfooter>
<columns>
    <column width="100%">
        <sections>
            <section id="{EB813F55-D4A8-4A95-AF10-162655D9FB91}" showbar="false" columns="1" name="Section">
                <labels>
                    <label description="Information" languagecode="1033" />
                </labels>
                <rows>
                    <row>
                        <cell id="{28AB7101-C235-4DEF-A3A9-5B3915AE153B}">
                            <labels>
                                <label description="Status Reason" languagecode="1033" />
                            </labels>
                            <control id="my_statuscode" classid="{3EF39988-22BB-4f0b-BBBE-64B5A3748AEE}" isunbound="true">
                                <parameters>
                                    <OptionSetName>my_dialogoptionset</OptionSetName>
                                </parameters>
                            </control>
                        </cell>
                    </row>
                </rows>
            </section>
        </sections>
    </column>
</columns>
</tab>
</tabs>
You can see the global option set below.
<optionsets>
    <optionset Name="my_dialogoptionset" localizedName="Dialog Option Set">
        <OptionSetType>picklist</OptionSetType>
        <IsGlobal>1</IsGlobal>
        <IntroducedVersion>1.0.0.0</IntroducedVersion>
        <IsCustomizable>1</IsCustomizable>
        <ExternalTypeName></ExternalTypeName>
        <displaynames>
            <displayname description="Dialog Option Set" languagecode="1033" />
        </displaynames>
        <Descriptions>
            <Description description="" languagecode="1033" />
        </Descriptions>
        <options>
            <option value="4" ExternalValue="" Color="#0000ff">
                <labels>
                    <label description="Canceled" languagecode="1033" />
                </labels>
                <Descriptions>
                    <Description description="" languagecode="1033" />
                </Descriptions>
            </option>
            <option value="5" ExternalValue="" Color="#0000ff">
                <labels>
                    <label description="Out-Sold" languagecode="1033" />
                </labels>
                <Descriptions>
                    <Description description="" languagecode="1033" />
                </Descriptions>
            </option>
        </options>
    </optionset>
</optionsets>
The most important thing about this is the classid value. There is only one class id for each data type in Dynamics. You can see the list of data types and their proper class id below.
| Single Line of Text | {4273EDBD-AC1D-40d3-9FB2-095C621B552D} |
| Multiple Lines of Text | {E0DECE4B-6FC8-4a8f-A065-082708572369} |
| Option Set | {3EF39988-22BB-4f0b-BBBE-64B5A3748AEE} |
| MultiSelect Option Set | {4AA28AB7-9C13-4F57-A73D-AD894D048B5F} |
| Two Options | {67FAC785-CD58-4f9f-ABB3-4B7DDC6ED5ED} |
| Status | {3EF39988-22BB-4f0b-BBBE-64B5A3748AEE} |
| Status Reason | {5D68B988-0661-4db2-BC3E-17598AD3BE6C} |
| Whole Number | {C6D124CA-7EDA-4a60-AEA9-7FB8D318B68F} |
| Floating Point Number | {0D2C745A-E5A8-4c8f-BA63-C6D3BB604660} |
| Decimal Number | {C3EFE0C3-0EC6-42be-8349-CBD9079DFD8E} |
| Currency | {533B9E00-756B-4312-95A0-DC888637AC78} |
| Date and Time | {5B773807-9FB2-42db-97C3-7A91EFF8ADFF} |
| Lookup | {270BD3DB-D9AF-4782-9025-509E298DEC0A} |
| Customer | {270BD3DB-D9AF-4782-9025-509E298DEC0A} |
| Owner | {270BD3DB-D9AF-4782-9025-509E298DEC0A} |
| Unique ID | {5546E6CD-394C-4bee-94A8-4425E17EF6C6} |
My custom dialog now looks like this. If you don’t know how to create the buttons, follow the instructions in Bob’s blog post.
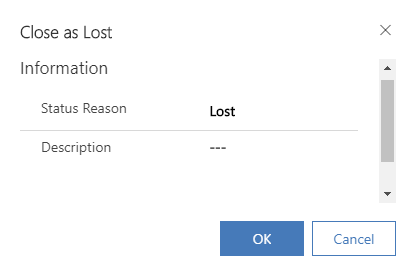
The dialog consists of only two fields - Status Reason and Description. I did want to include the Actual Revenue field, however it seemed impossible to use, because the currency data type is not supported in custom dialogs (same for the Competitor field which is a lookup data type). I didn’t include the Close Date field, we can just use the TS function Date().
Now there comes the interesting part. The system dialog box closes the opportunity in the chosen status reason and refreshes the page. How are we going to do this? Simply, we are going to write a TypeScript library which will contain all the functions we need. If you wonder why I’m using TypeScript, it’s because of the async requests. I recommend you to use it, because you never know when you are going to need to do something asynchronous.
function OpenDialog() : void {
    var options : any =
    {
        dialogName: 'custom',
        position: 1
    };
    var data : any =
    {
        my_guid: Xrm.Page.data.entity.getId(),
    };
    (Xrm.Navigation as any).openDialog("CustomDialog", options, data);
}

function onClick_Cancel() : void {
    Xrm.Page.ui.close();
}

async function onClick_OK() : Promise<void> {

    var inputParameters : any =
    {
        opportunityId : Xrm.Page.data.attributes.get("my_guid").getValue(),
        statuscode : Xrm.Page.data.attributes.get("my_statuscode").getValue(),
        description : Xrm.Page.data.attributes.get("my_description").getValue()
    }

    await CloseOpportunity(inputParameters);
}
Those are all the functions we need. The first one opens the dialog and is being called from our ribbon button. Then, there is a function for the Cancel button and the OK button.
You can see the my_guid attribute in the inputParameters object. I’ve added this field as query string input parameter. You can send to your dialog anything you need from the form context.
<FormXml>
    <forms type="dialog">
        <form>
            <formparameters>
                <querystringparameter name="my_guid" type="SafeString" />
            </formparameters>
Now that we have all the input that we need for the loseOpportunity request, we can write the function that closes the opportunity.
async function CloseOpportunity(inputParameters : any) : Promise<void> {
    var opportunityclose : any = {
        "opportunityid@odata.bind": "/opportunities" + inputParameters.opportunityId.replace("{", "(").replace("}", ")"),
        "@odata.type": "Microsoft.Dynamics.CRM.opportunityclose",
        "actualrevenue": 0,
        "actualend": new Date(),
        "description": inputParameters.description
    }

    var loseOpportunityRequest : any = {
        OpportunityClose: opportunityclose,
        Status: inputParameters.statuscode,

        getMetadata: function () {
            return {
                boundParameter: null,
                parameterTypes: {
                    "OpportunityClose": {
                        "typeName": "mscrm.opportunityclose",
                        "structuralProperty": 5
                    },
                    "Status": {
                        "typeName": "Edm.Int32",
                        "structuralProperty": 1
                    }
                },
                operationType: 0,
                operationName: "LoseOpportunity"
            };
        }
    };
    await Xrm.WebApi.online.execute(loseOpportunityRequest);
    await Xrm.Page.ui.close();
    await parent.window.location.reload();
}
And that’s it! We have our fully working custom dialog. In order to use it, you have to create a button in the Ribbon Workbench and include it on a form in your solution. You can download the solution here.
Comments
Radek Novák
Hi František,
Thank you for you great article! We implemented several custom dialogs with success.
Now we are facing issue with implementation of “MultiSelect Option Set” custom control. We use the same XML configuration as for “Option Set” but we cannot see any list of values.
Have you ever implemented “MultiSelect Option Set”? If so, can you share with us some hints or code examples?
Thank you so much!
Best Regards
Radek
Frantisek Capek
Hey Radek,
MultiSelect Option Set is unfortunately not supported (needless to say that the whole concept of custom dialogs is not supported since there are custom controls now).
Regards, Frantisek
radekartemis
Hi František!
Thank you for your reply. Even it’s not possible, the information is valuable for us.
Best regards!
Radek
Bob Guidinger
Thanks for writing part 3 - I obviously never got around to it! Great post!
Frantisek Capek
Thank you Bob! :-)
PhuocLe
I create a webapp that help you easy to work with it. http://crmdialog.phuocle.net
Jordan Allen
I may be very late to this but I’m not finding information on custom controls as an alternative to what you and Bob have laid out. Can you point me in the right direction?
Jordan Allen
Sorry, my last comment is irrelevant. I have read about the support for customization on close opportunity dialog. I am trying to customize the close order dialog. I will try your solution for this use case
Reddy Raja
Hi Frantisek Great Post!!! can I create multiple dialog boxes in single solution? If yes, please explain how.
Frantisek Capek
Hey @Reddy Raja, Depends if you are compiling your solution and using Solution Packager or if you are editing just the Customizations.xml file. If you are using Solution Packager, just add more definitions to the Dialogs folder. If you need to edit the Customizations.xml file, add more definitions under the element.
Don't forget to reference dialog IDs in the root components in the solution.xml file.
Once you have more dialogs in your solution, simply reference their UniqueName in your client-side code.
I hope this answered your question.
Regards, Frantisek
PhuocLe
Until now, I confirrmed all my dialogs still worked. Hope Microsoft support this dialog in the future.
To submit comments, go to GitHub Discussions.