Jekyll2023-12-18T14:06:29+00:00https://blog.thenetw.org/feed/index.xmlNETWORG | BlogRead our experiences while we help others{"avatar"=>"/assets/images/networg.png", "bio"=>"Read our experiences while we help others", "links"=>[{"label"=>"Website", "icon"=>"fas fa-fw fa-link", "url"=>"https://networg.com"}, {"label"=>"Facebook", "icon"=>"fab fa-fw fa-facebook", "url"=>"https://fb.me/thenetworg"}, {"label"=>"Twitter", "icon"=>"fab fa-fw fa-twitter-square", "url"=>"https://twitter.com/thenetworg"}, {"label"=>"GitHub", "icon"=>"fab fa-fw fa-github", "url"=>"https://github.com/networg"}, {"label"=>"Instagram", "icon"=>"fab fa-fw fa-instagram", "url"=>"https://instagram.com/thenetworg"}, {"label"=>"LinkedIn", "icon"=>"fab fa-fw fa-linkedin", "url"=>"https://www.linkedin.com/company/networg/"}]}Power Automate Delete Trigger - Missing record values2023-10-29T09:00:00+00:002023-10-29T09:00:00+00:00https://blog.thenetw.org/2023/10/29/power-automate-delete-trigger-missing-record-values<p>If you are using Power Automate Flow with MS Dataverse Delete trigger and trying to find a way to retrieve attributes value from a deleted record, you are in the right place!</p>
<h2 id="issue-description">ISSUE DESCRIPTION</h2>
<p>MS Dataverse Delete trigger is triggered post action. That means that record values are already missing from the database when trigger is triggered. Therefore, if you want to reuse some value that was part of that record, you will not be able to.</p>
<h2 id="how-to-do-it">HOW TO DO IT</h2>
<h3 id="requirements">REQUIREMENTS</h3>
<ul>
<li>Audit needs to be enabled globally in environment</li>
<li>Audit need to be enabled on entity you are targeting</li>
</ul>
<h3 id="implementation">IMPLEMENTATION</h3>
<ul>
<li>You need to get last Audit record related to deleted record.
<ul>
<li>OData example: <code class="language-plaintext highlighter-rouge">/audits?$filter=_objectid_value eq ''&$orderby=createdon desc&$top=1</code></li>
</ul>
</li>
<li>This call will return Audit record with <code class="language-plaintext highlighter-rouge">changedata</code> attribute</li>
<li><code class="language-plaintext highlighter-rouge">changedata</code> value is stringified JSON object which will contain <code class="language-plaintext highlighter-rouge">changedAttributes</code> array</li>
<li>Parse this JSON object and you’ll get last existed values in <code class="language-plaintext highlighter-rouge">oldValue</code> object key value of <code class="language-plaintext highlighter-rouge">changedAttributes</code> array</li>
</ul>
<p>Hope this helps.</p>Adel SabicIf you are using Power Automate Flow with MS Dataverse Delete trigger and trying to find a way to retrieve attributes value from a deleted record, you are in the right place!You can’t do that because “… we said so” - Part 12023-10-16T09:00:00+00:002023-10-16T09:00:00+00:00https://blog.thenetw.org/2023/10/16/you-cant-do-that-because-we-said-so-part-1<p>This is a long overdue article (probably a series) about how corporate IT security is often forcing “security through obscurity” and how it is not helping anyone. The first in the series is going to address deployments and authentication - and the things we encountered while deploying Power Platform solutions in customer tenants.</p>
<!-- more -->
<h1 id="the-ideal-process">The ideal process</h1>
<p>Automation is at heart of everything we do in our company. From builds, through testing to deploys. Deployments to production (customer tenants) are done via Azure Pipelines, which then use a shared Service Principal in Entra to authenticate to the customer tenant and deploy the solution to the Dataverse environment.</p>
<p>We utilize a separate tenant which also hosts our production service deployments, so everything is separate from our company’s business tenant. Access is granted in a Just-in-Time (JIT) and Just-Enough-Administration (JEA) principles, so that nobody has access unless they request it for a limited time. The service principal (we operate quite a lot of them, but I will focus on the one used specifically for deployments right now) is a multi-tenant app registration which has no scopes or permissions granted to it, since all permissions are configured on the <a href="https://learn.microsoft.com/en-us/power-platform/admin/manage-application-users&WT.mc_id=AZ-MVP-5003178">specific environment</a>.</p>
<p>The service principal is set up with a certificate, which is then used to authenticate via <a href="https://learn.microsoft.com/en-us/azure/active-directory/develop/v2-oauth2-client-creds-grant-flow&WT.mc_id=AZ-MVP-5003178">client_credentials</a> flow. The certificate is stored in <a href="https://learn.microsoft.com/en-us/azure/devops/pipelines/library/secure-files?view=azure-devops&WT.mc_id=AZ-MVP-5003178">Secure Files in AzDO</a> and access to it is granted only to production pipelines.</p>
<p>We also utilize a separate deployment principal for internal DEV environments, so deployments are truly separated.</p>
<p>Similar situation is with services (like Word converter, e-mail connector, Adaptive Cards and many others which we run). Each is a separate service principal, in case of a connector available for Power Automate, a second, dedicated, service principal for Power Automate as a client is used which is used for user authentication and obtaining the token for the backend service. I admit that this partially <a href="https://github.com/microsoft/PowerPlatformConnectors/issues/596">has a flaw</a>, but since the service principal in Flow is used only for user authentication (not for service-to-service communciation), there is little to no risk of this being abused, unless customer tenant application security is configured wrong - for example, allow to call a custom API with any valid S2S token etc. which should never be allowed! With Power Automate, we previously used the “unofficial” support for client_credentials in custom connectors which did the job, with Microsoft <a href="https://powerapps.microsoft.com/en-us/blog/public-preview-of-new-custom-connector-enhancements/">enabling this functionality officially</a> without any workarounds (this brings another challenge, but more about that later).</p>
<h1 id="what-do-we-have-to-deal-with-during-deployments">What do we have to deal with during deployments</h1>
<p>Starting with onboarding, the customer is asked to grant consent to all the required service principals - the one for deployment, and any others which are required by the deployed workload (for custom connectors to work for example). This is a one-time thing. And this is the first problem.</p>
<p>The corporate IT can take weeks or months to consent the principal, requires a bunch of meetings and explaining (usually to different people) and sometimes it feels like it’s the first time they heard the “service principal” term. Usually they raise a lot of questions, which are not even relevant and sometimes it feels like the people in charge of security there can’t even read Microsoft’s own documentation and we have to do all the explaining.</p>
<p>This is both very boring and annoying, and prolongs the entire process.</p>
<p>I also love it when the conversation goes into the “this is not safe, opens up a lot of possible security issues etc.” and few minutes after, they say - “yeah, we will give you a service account”. Yeah, sure. Give us an interactive service account, which has access god knows where (it can browse the tenant, and <a href="https://aadinternals.com/aadinternals/">do bunch of other funny things</a>) and requires some more licenses. Then you get a password for the service account, usually not even an enforced MFA or CA policy and you are good to go. Ehm, what?</p>
<p>You’re telling me this is more secure than a service principal? I don’t think so.</p>
<p>When we engage with the corporate IT, the discussions are all the same. I especially love when it starts steering into the ways of manual deployment… We leverage automation, because we deploy tens of solutions. We want the process to be as automated and human-error prone as possible, and the “offical” corporate IT guidance is - do it manually.</p>
<h1 id="why-is-creating-a-service-principal-such-a-big-problem">Why is creating a Service Principal such a big problem?</h1>
<p>Sometimes, it’s even an issue to get a service principal created. The common reasons are - there is no process for that, we (IT) don’t understand service principals, or that the IT is afraid we will have too many permissions in the tenant.</p>
<p>The last is a valid concern. But there are ways! If we are talking about Graph API, there ways, to limit certain permissions - like via <a href="https://learn.microsoft.com/en-us/exchange/permissions-exo/application-rbac">Exchange Online’s RBAC</a>, which limits the application scope to a specific group of people. I totally understand that nobody wants to give full mailbox access of every user in their tenant across the globe, just because a branch in one small country needs to use it for a specific application.</p>
<p>The similar goes for SharePoint. The exposure can be controlled via use of <code class="language-plaintext highlighter-rouge">Sites.Selected</code> scope, further described <a href="https://devblogs.microsoft.com/microsoft365dev/controlling-app-access-on-specific-sharepoint-site-collections/">here</a>.</p>
<p>There are of course scenarios, where you can’t limit this, like working with AAD’s Group Memberships, in a sync scenario, where you need <code class="language-plaintext highlighter-rouge">GroupMember.ReadWrite.All</code>. But then, all of this is about customer and supplier trust, which we have estabilished multiple times.</p>
<h1 id="security-through-obscurity-and-shadow-it">Security through obscurity and shadow IT</h1>
<p>While the corporate IT attempts to fight <a href="https://learn.microsoft.com/en-us/defender-cloud-apps/tutorial-shadow-it?WT.mc_id=AZ-MVP-5003178">shadow IT</a> which, I ackowledge, is a huge security issue and a nightmare of many, including us, they shouldn’t on the other hand actively push us towards doing it.</p>
<p>While I understand that a service account has to be explicitly used in many Power Platform scenarios still, it’s becoming less of an issue. We have solution for Power Automate connectors, we have a solution for pipelines, there’s a solution for environment management.</p>
<p>I will just briefly touch the service account credentials topic. You usually end up with a username and a password sent via an e-mail. As a partner delivering the solution - where do you store such password? Do you enable MFA on that account? Does the customer even allow MFA on the account? How do you handle access revocation when an employee who had access to the credentials when they leave? Do you rotate the password (which can break a lot of Power Platform connector scenarios)? Just a few things to think about.</p>
<p>Why not let us use service principals, and leverage all the benefits which come with it like auditing and conditional access to further restrict malicious usage?</p>
<h1 id="my-ask-to-you-as-an-it-decision-maker">My ask to you as an IT decision maker</h1>
<p>Please do think twice before you say “no” to creating a service principal or granting consent (and also do think twice before granting it 😊). Sometimes, it makes me feel that we are not on the same side, while we should be striving to innovate and make our users more productive and happy.</p>Jan HajekThis is a long overdue article (probably a series) about how corporate IT security is often forcing “security through obscurity” and how it is not helping anyone. The first in the series is going to address deployments and authentication - and the things we encountered while deploying Power Platform solutions in customer tenants.Entra ID user and group provisioning with Bitwarden2023-09-18T07:00:00+00:002023-09-18T07:00:00+00:00https://blog.thenetw.org/2023/09/18/entra-id-user-and-group-provisioning-with-bitwarden<p><a href="https://networg.com">We</a> have been using <a href="https://bitwarden.com">Bitwarden</a> in our company as a primary password manager. Previously, we were using their <a href="https://bitwarden.com/help/directory-sync/">directory connector</a> but we decided to switch to <a href="https://bitwarden.com/help/about-scim/">SCIM</a> synced by Entra ID. This article will guide you through the setup we had to undergo.</p>
<p><a href="https://hajekj.net/2023/09/18/entra-id-user-and-group-provisioning-with-bitwarden/">Full Article</a></p>Jan HajekWe have been using Bitwarden in our company as a primary password manager. Previously, we were using their directory connector but we decided to switch to SCIM synced by Entra ID. This article will guide you through the setup we had to undergo.Example of using Power FX SDK, talking to Dataverse and implementing custom functions2023-09-01T13:00:00+00:002023-09-01T13:00:00+00:00https://blog.thenetw.org/2023/09/01/example-of-using-power-fx-sdk-talking-to-dataverse-and-implementing-custom-functions<p>The built in permission system in Dataverse is fine for most usecases and offers flexible way of managing access to diferent entities. However, it’s not really usable for more complex authorization rules, that might be different for specific users. We also want these rules to work with runtime variables or data in the system itself, which may change frequently.</p>
<p>To get this flexibility, we opted for Power FX which the customizers are already familiar with and it is slowly getting used on more places in Power Platform (not just Canvas Power Apps)</p>
<p>Few weeks ago Low-code Dataverse plugins were introduced as a preview feature. This feature could have been used but we would have gotten limited control over impersonation / privilege elevation which is necessary in our case. Also we wanted to provide administrators with an easy-to-use UI for configuration and make the expressions to contain the least possible amount of code. This approach also doesn’t allow us to use our own custom functions, which turned out to be neccessary, as you will see bellow.</p>
<p>Lastly, since we wanted these rules to work outside of Dataverse plugins, in our external API connected to dataverse, as well, we settled on implementing it ourselves.</p>
<p>Thanks to the <a href="https://github.com/microsoft/Power-Fx">Power Fx GitHub repo</a>, this task wasn’t as daunting as it might have looked. I would like to praise the team behind it for providing great range of tests, from which I could easily see, how to use the library.</p>
<h2 id="problem-1-run-time-vs-design-time-objects">Problem 1: Run-time (vs. design-time) objects</h2>
<p>Because we want to use this as a permission model, that would decide if the user were or were not allowed to perform an action, we need to have some form of context of the request. We want to be able to check, what the user wants to change, so we need to parse and use the Request object.</p>
<p>To do this, we add a new variable in the symbol table called RequestBody, which will be a representation of the request object the user sends. For this, we wrote a helper function that allows us to cast a Newtonsoft.Json JObject into a RecordValue, so that the expression can use it.</p>
<p>We can use the handy Marshaller that Power Fx repo provides, that allows us to cast primitive C# types into Power Fx FormulaTypes and FormulaValues</p>
<div class="language-csharp highlighter-rouge"><div class="highlight"><pre class="highlight"><code><span class="k">if</span> <span class="p">(</span><span class="n">PrimitiveValueConversions</span><span class="p">.</span><span class="nf">TryGetFormulaType</span><span class="p">(</span><span class="n">objetToCast</span><span class="p">.</span><span class="nf">GetType</span><span class="p">(),</span> <span class="k">out</span> <span class="n">FormulaType</span> <span class="n">powerFxType</span><span class="p">))</span>
<span class="p">{</span>
<span class="k">return</span> <span class="n">PrimitiveValueConversions</span><span class="p">.</span><span class="nf">Marshal</span><span class="p">(</span><span class="n">objetToCast</span><span class="p">,</span> <span class="n">powerFxType</span><span class="p">);</span>
<span class="p">}</span>
</code></pre></div></div>
<p>We can also check if the property value inside is a JArray and cast it approprietly. The equivalent of an Array in Power Fx is a SingleColumnTable, so you can cast your array of primitives into that.</p>
<div class="language-csharp highlighter-rouge"><div class="highlight"><pre class="highlight"><code> <span class="n">FormulaValue</span><span class="p">.</span><span class="nf">NewSingleColumnTable</span><span class="p">(</span><span class="n">arrayOfPrimitives</span><span class="p">.</span><span class="nf">Select</span><span class="p">(</span><span class="n">x</span> <span class="p">=></span> <span class="n">FormulaValue</span><span class="p">.</span><span class="nf">New</span><span class="p">((</span><span class="kt">string</span><span class="p">)</span><span class="n">x</span><span class="p">!)))</span>
</code></pre></div></div>
<p>You might think there may have been an “obvious” choice on how to achieve the same result using the built in function “ParseJSON”, but that returns an Untyped object which you would then need to cast with functions such as Boolean or Value.</p>
<p>In case of update or delete requests, we can also provide a reference to the record that’s being affected with a handy object Record.</p>
<p>Having an object with marshalled types allows the evaluator to know exactly what types each property is, which gives us accurate check result when working with incomparable types. We shouldn’t be allowed to add a number to a string for example. Casting a JArray into a single column table also gives us the use of the in operator, which will surely come in handy.</p>
<p>An issue with working with objects, that are unknown at runtime is the fact that you cannot reference properties, that might not be there.</p>
<p>Consider the following example: We want to restrict the user from disabling a record using the api. Every other change is permitted. We could write a Power Fx expression like so:</p>
<div class="language-csharp highlighter-rouge"><div class="highlight"><pre class="highlight"><code><span class="nf">If</span><span class="p">(</span><span class="n">RequestBody</span><span class="p">.</span><span class="n">statuscode</span> <span class="p"><></span> <span class="m">1</span><span class="p">,</span> <span class="k">true</span><span class="p">,</span> <span class="k">false</span><span class="p">)</span> <span class="c1">//If for emphasis</span>
</code></pre></div></div>
<p>This will work correctly if the user actually tries to disable the record, but wont work in other cases, because the statuscode will not be present in the requestbody and we’ll get an error.</p>
<pre><code class="language-error">Errors: Error 1-3: Name isn't valid. 'statuscode' isn't recognized.
</code></pre>
<p>We can solve this problem using custom functions.</p>
<p>Custom functions allow us to register a C# function that can then be used in Power Fx expressions just like any other. To add a function, we need to define it’s name, return type and the types of it’s parameters. Here, we are creating a “ContainsKey” function, that will return a boolean and tell you, if a Record contains an attribute with a certain key.</p>
<div class="language-csharp highlighter-rouge"><div class="highlight"><pre class="highlight"><code><span class="k">public</span> <span class="k">class</span> <span class="nc">ContainsKeyFunction</span> <span class="p">:</span> <span class="n">ReflectionFunction</span>
<span class="p">{</span>
<span class="k">public</span> <span class="nf">ContainsKeyFunction</span><span class="p">()</span> <span class="p">:</span> <span class="k">base</span><span class="p">(</span><span class="s">"ContainsKey"</span><span class="p">,</span> <span class="n">FormulaType</span><span class="p">.</span><span class="n">Boolean</span><span class="p">,</span> <span class="n">RecordType</span><span class="p">.</span><span class="nf">Empty</span><span class="p">(),</span> <span class="n">FormulaType</span><span class="p">.</span><span class="n">String</span><span class="p">)</span>
<span class="p">{</span>
<span class="p">}</span>
<span class="k">public</span> <span class="k">static</span> <span class="n">BooleanValue</span> <span class="nf">Execute</span><span class="p">(</span><span class="n">RecordValue</span> <span class="n">collection</span><span class="p">,</span> <span class="n">StringValue</span> <span class="n">key</span><span class="p">)</span>
<span class="p">{</span>
<span class="k">return</span> <span class="n">FormulaValue</span><span class="p">.</span><span class="nf">New</span><span class="p">(</span><span class="n">collection</span><span class="p">.</span><span class="nf">GetField</span><span class="p">(</span><span class="n">key</span><span class="p">.</span><span class="n">Value</span><span class="p">)</span> <span class="k">is</span> <span class="n">not</span> <span class="n">BlankValue</span><span class="p">);</span>
<span class="p">}</span>
</code></pre></div></div>
<p>Sadly, this function will not be enough, since the check doesn’t like invalid names even in branches it will not reach. Writing the following expression:</p>
<div class="language-csharp highlighter-rouge"><div class="highlight"><pre class="highlight"><code><span class="nf">If</span><span class="p">(</span><span class="nf">ContainsKey</span><span class="p">(</span><span class="n">RequestBody</span><span class="p">,</span> <span class="s">"statuscode"</span><span class="p">),</span> <span class="n">RequestBody</span><span class="p">.</span><span class="n">statuscode</span> <span class="p"><></span> <span class="m">1</span><span class="p">,</span> <span class="k">true</span><span class="p">)</span>
</code></pre></div></div>
<p>will give us the same error. ‘statuscode’ is not recognized, even though we made sure it exists before checking it. This issue is also solvable by yet another custom function.</p>
<div class="language-csharp highlighter-rouge"><div class="highlight"><pre class="highlight"><code><span class="k">public</span> <span class="k">class</span> <span class="nc">TryEqualsDecimal</span> <span class="p">:</span> <span class="n">ReflectionFunction</span>
<span class="p">{</span>
<span class="k">public</span> <span class="nf">TryEqualsDecimal</span><span class="p">()</span> <span class="p">:</span> <span class="k">base</span><span class="p">(</span><span class="s">"TryEquals"</span><span class="p">,</span> <span class="n">FormulaType</span><span class="p">.</span><span class="n">Boolean</span><span class="p">,</span> <span class="n">RecordType</span><span class="p">.</span><span class="nf">Empty</span><span class="p">(),</span> <span class="n">FormulaType</span><span class="p">.</span><span class="n">String</span><span class="p">,</span> <span class="n">FormulaType</span><span class="p">.</span><span class="n">Decimal</span><span class="p">)</span>
<span class="p">{</span>
<span class="p">}</span>
<span class="k">public</span> <span class="k">static</span> <span class="n">BooleanValue</span> <span class="nf">Execute</span><span class="p">(</span><span class="n">RecordValue</span> <span class="n">collection</span><span class="p">,</span> <span class="n">StringValue</span> <span class="n">key</span><span class="p">,</span> <span class="n">DecimalValue</span> <span class="k">value</span><span class="p">)</span>
<span class="p">{</span>
<span class="k">if</span> <span class="p">(</span><span class="n">collection</span><span class="p">.</span><span class="nf">GetField</span><span class="p">(</span><span class="n">key</span><span class="p">.</span><span class="n">Value</span><span class="p">)</span> <span class="k">is</span> <span class="n">BlankValue</span><span class="p">)</span> <span class="k">return</span> <span class="n">FormulaValue</span><span class="p">.</span><span class="nf">New</span><span class="p">(</span><span class="k">false</span><span class="p">);</span>
<span class="k">return</span> <span class="n">FormulaValue</span><span class="p">.</span><span class="nf">New</span><span class="p">(((</span><span class="n">DecimalValue</span><span class="p">)</span><span class="n">collection</span><span class="p">.</span><span class="nf">GetField</span><span class="p">(</span><span class="n">key</span><span class="p">.</span><span class="n">Value</span><span class="p">)).</span><span class="n">Value</span> <span class="p">==</span> <span class="k">value</span><span class="p">.</span><span class="n">Value</span><span class="p">);</span>
<span class="p">}</span>
<span class="k">public</span> <span class="k">class</span> <span class="nc">TryEqualsString</span> <span class="p">:</span> <span class="n">ReflectionFunction</span>
<span class="p">{</span>
<span class="k">public</span> <span class="nf">TryEqualsString</span><span class="p">()</span> <span class="p">:</span> <span class="k">base</span><span class="p">(</span><span class="s">"TryEquals"</span><span class="p">,</span> <span class="n">FormulaType</span><span class="p">.</span><span class="n">Boolean</span><span class="p">,</span> <span class="n">RecordType</span><span class="p">.</span><span class="nf">Empty</span><span class="p">(),</span> <span class="n">FormulaType</span><span class="p">.</span><span class="n">String</span><span class="p">,</span> <span class="n">FormulaType</span><span class="p">.</span><span class="n">String</span><span class="p">)</span>
<span class="p">{</span>
<span class="p">}</span>
<span class="k">public</span> <span class="k">static</span> <span class="n">BooleanValue</span> <span class="nf">Execute</span><span class="p">(</span><span class="n">RecordValue</span> <span class="n">collection</span><span class="p">,</span> <span class="n">StringValue</span> <span class="n">key</span><span class="p">,</span> <span class="n">FormulaValue</span> <span class="k">value</span><span class="p">)</span>
<span class="p">{</span>
<span class="k">if</span> <span class="p">(</span><span class="n">collection</span><span class="p">.</span><span class="nf">GetField</span><span class="p">(</span><span class="n">key</span><span class="p">.</span><span class="n">Value</span><span class="p">)</span> <span class="k">is</span> <span class="n">BlankValue</span><span class="p">)</span> <span class="k">return</span> <span class="n">FormulaValue</span><span class="p">.</span><span class="nf">New</span><span class="p">(</span><span class="k">false</span><span class="p">);</span>
<span class="k">return</span> <span class="n">FormulaValue</span><span class="p">.</span><span class="nf">New</span><span class="p">(</span><span class="n">collection</span><span class="p">.</span><span class="nf">GetField</span><span class="p">(</span><span class="n">key</span><span class="p">.</span><span class="n">Value</span><span class="p">)</span> <span class="p">==</span> <span class="k">value</span><span class="p">);</span>
<span class="p">}</span>
</code></pre></div></div>
<p>Lucky for us, Power Fx custom functions support overloading by defining the same name of a function, in our case “TryEquals” and different parameters (One takes a decimal, the other a string). With this we can safely work with objects that are not known to us on design time.</p>
<div class="language-csharp highlighter-rouge"><div class="highlight"><pre class="highlight"><code> <span class="nf">TryEquals</span><span class="p">(</span><span class="n">RequestBody</span><span class="p">,</span> <span class="s">"statuscode"</span><span class="p">,</span> <span class="m">2</span><span class="p">)</span>
</code></pre></div></div>
<h2 id="problem-2-connection-with-dataverse">Problem 2: Connection with Dataverse</h2>
<p>But let’s talk about the main deal: How do we connect to Dataverse and replicate the ability of Check and Autocomplete with Power Fx? We want something similar to how Canvas Apps function.</p>
<p>In Cavas Apps, if you want to use a Dataverse table inside your expression, you have to add it explicitly as a data source. Once you do that, you get access to the same type checking and intelisence that you would expect. In our case, there is no way to “add a datasource”. So, can we do better? Yeah.</p>
<p>We can use the built in tokenizer to help us visualize our expression. We can split our expression into tokens and detect the datasources that we’ll require. Here’s an example of an expression we can use:</p>
<div class="language-csharp highlighter-rouge"><div class="highlight"><pre class="highlight"><code><span class="nf">First</span><span class="p">(</span><span class="n">Accounts</span><span class="p">)</span>
</code></pre></div></div>
<p>This will split the tokens as such:<br />
<img src="/uploads/2023/08/using-powerfx-with-dataverse2.png" alt="tokenSplit" /></p>
<p>
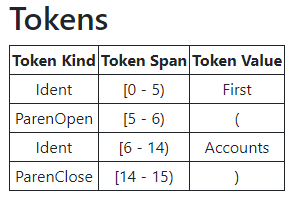
We can only focus on those tokens, that are identifying something (Ident).</p>
<div class="language-csharp highlighter-rouge"><div class="highlight"><pre class="highlight"><code><span class="n">_powerFxEngine</span><span class="p">.</span><span class="nf">Tokenize</span><span class="p">(</span><span class="n">expression</span><span class="p">).</span><span class="nf">Where</span><span class="p">(</span><span class="n">x</span> <span class="p">=></span> <span class="n">x</span><span class="p">.</span><span class="n">Kind</span> <span class="p">==</span> <span class="n">TokKind</span><span class="p">.</span><span class="n">Ident</span><span class="p">);</span>
</code></pre></div></div>
<p>After that, let’s get rid of those tokens that we know we don’t need. One such example are Functions. We know that the Ident “First” is not going to be a Dataverse table but a Function name. So let’s get rid of known function names</p>
<div class="language-csharp highlighter-rouge"><div class="highlight"><pre class="highlight"><code><span class="c1">// Filter out the tokens that are present in _powerFxEngine.SupportedFunctions</span>
<span class="kt">var</span> <span class="n">supportedTokens</span> <span class="p">=</span> <span class="n">tokens</span><span class="p">.</span><span class="nf">Select</span><span class="p">(</span><span class="n">x</span> <span class="p">=></span> <span class="p">(</span><span class="n">IdentToken</span><span class="p">)</span><span class="n">x</span><span class="p">).</span><span class="nf">Where</span><span class="p">(</span><span class="n">token</span> <span class="p">=></span> <span class="p">!</span><span class="n">_powerFxEngine</span><span class="p">.</span><span class="nf">GetAllFunctionNames</span><span class="p">().</span><span class="nf">Contains</span><span class="p">(</span><span class="n">token</span><span class="p">.</span><span class="n">Name</span><span class="p">));</span>
</code></pre></div></div>
<p>Now we should only have potential table names. We can download the list of Display and Logical names of all the tables in our Dataverse and cache it for future use (using the RetrieveAllEntitiesRequest). If you specify the “EntityFilters.Entity” filter, you should only get the basic info about the table, not the whole metadata.</p>
<p>We then iterate through IdentTokens that we have left and if we recognize a DisplayCollectionName, we can download (and cache) the full metadata of the specific table. In short, we will parse the expression and add the “DataSources” dynamically.</p>
<p>Now, we need to define Marshalling for Dataverse fields. We need to map AttributeTypeCode enum to a FormulaType of Power Fx and add it into the symbols.</p>
<p>In our case, we created a RecordType.Empty(), to which we have added a TableType for each required Dataverse Table.</p>
<p>For each attribute that we have in the metadata of the required table, we cast it from it’s Attribute metadata into the relevant FormulaType.</p>
<div class="language-csharp highlighter-rouge"><div class="highlight"><pre class="highlight"><code><span class="k">case</span> <span class="n">AttributeTypeCode</span><span class="p">.</span><span class="n">String</span><span class="p">:</span>
<span class="n">metadataType</span> <span class="p">=</span> <span class="n">metadataType</span><span class="p">.</span><span class="nf">Add</span><span class="p">(</span><span class="k">new</span> <span class="nf">NamedFormulaType</span><span class="p">(</span><span class="n">logicalName</span><span class="p">,</span> <span class="n">FormulaType</span><span class="p">.</span><span class="n">String</span><span class="p">,</span> <span class="n">displayName</span><span class="p">));</span>
<span class="k">break</span><span class="p">;</span>
</code></pre></div></div>
<p>In short: Create a RecordType. For each Dataverse table you are using, add a TableType into it, filled with NamedFormulaTypes for each Dataverse column. Return the RecordType and use it whereever you may need.</p>
<div class="language-csharp highlighter-rouge"><div class="highlight"><pre class="highlight"><code><span class="c1">// Intelisence</span>
<span class="n">Intellisense</span><span class="p">.</span><span class="n">IIntellisenseResult</span> <span class="n">intelisence</span> <span class="p">=</span> <span class="n">_powerFxEngine</span><span class="p">.</span><span class="nf">Suggest</span><span class="p">(</span><span class="n">expression</span><span class="p">,</span> <span class="nf">GetContextFromMetadata</span><span class="p">(</span><span class="n">expression</span><span class="p">),</span> <span class="n">expression</span><span class="p">.</span><span class="n">Length</span><span class="p">);</span>
<span class="c1">// Checking for errors</span>
<span class="n">CheckResult</span> <span class="n">check</span> <span class="p">=</span> <span class="n">_powerFxEngine</span><span class="p">.</span><span class="nf">Check</span><span class="p">(</span><span class="n">expression</span><span class="p">,</span> <span class="nf">GetContextFromMetadata</span><span class="p">(</span><span class="n">expression</span><span class="p">));</span>
</code></pre></div></div>
<p>Some pro tips:</p>
<ul>
<li>
<p>If you have fields on your table that share a Display name (In our case it was Email Address 1), Canvas apps add the logical name in parentheses after it into the display name, so that the user can differentiate.</p>
</li>
<li>
<p>
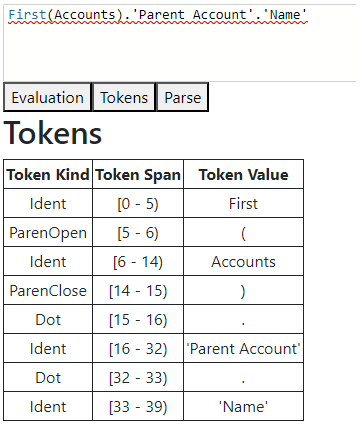
When marshalling the AttributeTypeCode.Lookup, you can check if the expression requires the whole object or not. For example: If I’m adding a property with a display name ‘Parent Account’, I can check if the original expression contains an Ident token with the same name. If not, I can say that the FormulaType of this is just TableEmpty, which will be the correct type but no additional metadata. If we have this Ident token in the expression, we can recursively download the Table add it (You will find the related Table name in the targets property). Now, your expression will have access the metadata of the two required tables.</p>
</li>
</ul>
<p><img src="/uploads/2023/08/using-powerfx-with-dataverse1.png" alt="tokenSplit" /></p>
<ul>
<li>The expression in Power Fx is made to be as user friendly as possible. That’s why, when writing it, we use display names of tables and fields or a specific culture (There may be a difference between using a comma or a dot for decimal numbers). When moving this from environment to environment however, we will need to transform the expression to be as neutral as possible. For this, you can use the <code class="language-plaintext highlighter-rouge">CheckResult.ApplyGetInvariant()</code> method, which will do exactly that.</li>
</ul>Matej SamlerThe built in permission system in Dataverse is fine for most usecases and offers flexible way of managing access to diferent entities. However, it’s not really usable for more complex authorization rules, that might be different for specific users. We also want these rules to work with runtime variables or data in the system itself, which may change frequently.Selection and filtering in Fluent UI DetailsList2023-02-02T09:00:00+00:002023-02-02T09:00:00+00:00https://blog.thenetw.org/2023/02/02/fluentui-detailslist-preserve-selecition-when-filtering<p>Recently I got my hands on Fluent UI component called <a href="https://developer.microsoft.com/en-us/fluentui#/controls/web/detailslist">DetailsList</a>. It is pretty handy component to show tabular data. There are many options how you can cusomize rendering of the table, rows and even its cells.</p>
<p><img src="/uploads/2023/02/fluentui-detailslist-1.png" alt="DetailsList" /></p>
<p>What I needed to acomplish was to add text input above the table. User would write text into the field, the table would filter acordingly. Nothing complicated or what I thought at first.</p>
<p>Component proved me othervise after I tried to implement it. I wanted to get inspired in one of <a href="https://developer.microsoft.com/en-us/fluentui#/controls/web/detailslist/compact">examples</a>, but even though the filtering is there, the table doesn’t keep previously selected rows on its own. I hope you will agree that it is not good ux. Imagine you select few rows, change filter to look for some specific row, and after you select another one and click a button to trigger some action, it will happen only for the displayed row, not the previously selected.</p>
<p>I started to look for some inspiration and after a while I managed to implement my own solution. If you want to jump into the code, feel free to click this link - <a href="https://codesandbox.io/s/fluent-ui-detailslist-preserve-selection-when-filtering-hptj03">codesandbox.io</a>, I will continue to explain it below.</p>
<p>To preserve selected items when they aren’t displayed because of filter, you will need Selection imported from @fluentui/react and useRef hook from react library.</p>
<p>Selection is stored in state variable using useState hook. The useRef hook stores selected keys inside of selectedKeys ref variable.</p>
<p>You can notice two functions defined inside of Selection object - onSelectionChanged and onItemsChanged. Those functions are what makes this code work. OnSelectionChanged triggers when you click on a row and change Selection. OnItemsChanged triggers when items in Selection changes.</p>
<p>Inside of the first function we want to compare previously selected keys inside of ref selectedKeys and currently selected keys inside of Selection. Outcome of this compare is saved back to the selectedKeys ref.</p>
<p>OnItemsChanged is used to “reselect” rows displayed in the table. It iterates through the Selection and sets row selected if the row stored in selectedKeys.</p>
<p>The cycle works like this:</p>
<ol>
<li>User selects a row.</li>
<li>OnSelectionChanged is triggered and row is stored in selectedKeys.</li>
<li>User inputs filter.</li>
<li>Table rows are filtered. Previously selected row is not displayed, but its key is stored in variable.</li>
<li>OnItemsChanged triggers because Selection got new array of items. Nothing happens since selected row is not present.</li>
<li>User select second row.</li>
<li>OnSelectionChanged is triggered. SelectedKeys variable fills with previously selected row and the new one.</li>
<li>User removes filter.</li>
<li>Table displays all rows. Both selected rows are displayed.</li>
<li>OnItemsChanged is triggered, iterates through Selection items and sets two rows as selected based on selectedKeys variable value.</li>
</ol>
<p><img src="/uploads/2023/02/fluentui-detailslist-2.png" alt="DetailsList selected" /></p>
<p><img src="/uploads/2023/02/fluentui-detailslist-3.png" alt="DetailsList selected and filtered" /></p>
<p>You can freelely filter through table and keep previously selected rows stored inside of a variable for later usage thanks to this implementation.</p>Ondrej JudaRecently I got my hands on Fluent UI component called DetailsList. It is pretty handy component to show tabular data. There are many options how you can cusomize rendering of the table, rows and even its cells.Flatten nested arrays2022-11-07T13:00:00+00:002022-11-07T13:00:00+00:00https://blog.thenetw.org/2022/11/07/flatten-array<p>I want to write a follow-up for one of my previous posts <a href="/2022/06/27/compose-in-apply-to-each/">Remove variables from apply to each action</a>. I have been using this technique quite a lot and run into a problematic situation with nested arrays.</p>
<p>Imagine you have a flow like this:</p>
<p><img src="/uploads/2022/11/2022-11-07-flatten-array-01.png" alt="flow" /></p>
<p>I list employees and I want to aggregate their open and closed opportunities. I want to use the compose action at the end of my apply for each action, so I can refer to it outside of the loop as I explained in the previous post.</p>
<p><img src="/uploads/2022/11/2022-11-07-flatten-array-02.png" alt="aggregation" /></p>
<p>Problem is that I need to have an array where the item will be an object, not another array. Usually, things don’t go as we want and the outcome of this loop in the Compose-Data action looks like this, a nested array:</p>
<div class="language-json highlighter-rouge"><div class="highlight"><pre class="highlight"><code><span class="p">[</span><span class="w">
</span><span class="p">[</span><span class="w">
</span><span class="p">{</span><span class="w">
</span><span class="nl">"name"</span><span class="p">:</span><span class="w"> </span><span class="s2">"Jane Doe"</span><span class="p">,</span><span class="w">
</span><span class="nl">"count"</span><span class="p">:</span><span class="w"> </span><span class="mi">3</span><span class="p">,</span><span class="w">
</span><span class="nl">"isClosed"</span><span class="p">:</span><span class="w"> </span><span class="kc">true</span><span class="w">
</span><span class="p">},</span><span class="w">
</span><span class="p">{</span><span class="w">
</span><span class="nl">"name"</span><span class="p">:</span><span class="w"> </span><span class="s2">"Jane Doe"</span><span class="p">,</span><span class="w">
</span><span class="nl">"count"</span><span class="p">:</span><span class="w"> </span><span class="mi">8</span><span class="p">,</span><span class="w">
</span><span class="nl">"isClosed"</span><span class="p">:</span><span class="w"> </span><span class="kc">false</span><span class="w">
</span><span class="p">}</span><span class="w">
</span><span class="p">],</span><span class="w">
</span><span class="p">[</span><span class="w">
</span><span class="p">{</span><span class="w">
</span><span class="nl">"name"</span><span class="p">:</span><span class="w"> </span><span class="s2">"Jonh Doe"</span><span class="p">,</span><span class="w">
</span><span class="nl">"count"</span><span class="p">:</span><span class="w"> </span><span class="mi">3</span><span class="p">,</span><span class="w">
</span><span class="nl">"isClosed"</span><span class="p">:</span><span class="w"> </span><span class="kc">true</span><span class="w">
</span><span class="p">},</span><span class="w">
</span><span class="p">{</span><span class="w">
</span><span class="nl">"name"</span><span class="p">:</span><span class="w"> </span><span class="s2">"Jonh Doe"</span><span class="p">,</span><span class="w">
</span><span class="nl">"count"</span><span class="p">:</span><span class="w"> </span><span class="mi">8</span><span class="p">,</span><span class="w">
</span><span class="nl">"isClosed"</span><span class="p">:</span><span class="w"> </span><span class="kc">false</span><span class="w">
</span><span class="p">}</span><span class="w">
</span><span class="p">]</span><span class="w">
</span></code></pre></div></div>
<p>I need it to look like this so I could work with it easier later:</p>
<div class="language-json highlighter-rouge"><div class="highlight"><pre class="highlight"><code><span class="p">[</span><span class="w">
</span><span class="p">{</span><span class="w">
</span><span class="nl">"name"</span><span class="p">:</span><span class="w"> </span><span class="s2">"Jane Doe"</span><span class="p">,</span><span class="w">
</span><span class="nl">"count"</span><span class="p">:</span><span class="w"> </span><span class="mi">3</span><span class="p">,</span><span class="w">
</span><span class="nl">"isClosed"</span><span class="p">:</span><span class="w"> </span><span class="kc">true</span><span class="w">
</span><span class="p">},</span><span class="w">
</span><span class="p">{</span><span class="w">
</span><span class="nl">"name"</span><span class="p">:</span><span class="w"> </span><span class="s2">"Jane Doe"</span><span class="p">,</span><span class="w">
</span><span class="nl">"count"</span><span class="p">:</span><span class="w"> </span><span class="mi">8</span><span class="p">,</span><span class="w">
</span><span class="nl">"isClosed"</span><span class="p">:</span><span class="w"> </span><span class="kc">false</span><span class="w">
</span><span class="p">},</span><span class="w">
</span><span class="p">{</span><span class="w">
</span><span class="nl">"name"</span><span class="p">:</span><span class="w"> </span><span class="s2">"Jonh Doe"</span><span class="p">,</span><span class="w">
</span><span class="nl">"count"</span><span class="p">:</span><span class="w"> </span><span class="mi">3</span><span class="p">,</span><span class="w">
</span><span class="nl">"isClosed"</span><span class="p">:</span><span class="w"> </span><span class="kc">true</span><span class="w">
</span><span class="p">},</span><span class="w">
</span><span class="p">{</span><span class="w">
</span><span class="nl">"name"</span><span class="p">:</span><span class="w"> </span><span class="s2">"Jonh Doe"</span><span class="p">,</span><span class="w">
</span><span class="nl">"count"</span><span class="p">:</span><span class="w"> </span><span class="mi">8</span><span class="p">,</span><span class="w">
</span><span class="nl">"isClosed"</span><span class="p">:</span><span class="w"> </span><span class="kc">false</span><span class="w">
</span><span class="p">}</span><span class="w">
</span><span class="p">]</span><span class="w">
</span></code></pre></div></div>
<p>I came up with a solution, a primitive one, but it works for this scenario. We can create a string out of the array, and replace all square brackets with an empty string. This new string will be concatenated with a new pair of square brackets and converted back to json.</p>
<div class="language-plaintext highlighter-rouge"><div class="highlight"><pre class="highlight"><code>json(
concat(
'[',
replace(
replace(
string(outputs('Aggregate-Opportunities')),
'[',
''
),
']',
''
),
']'
)
)
</code></pre></div></div>
<p><img src="/uploads/2022/11/2022-11-07-flatten-array-03.png" alt="correct outcome" /></p>
<p>While trying this approach, I run into one limitation. You can’t use it when you have an array as a value inside an object.</p>
<div class="language-json highlighter-rouge"><div class="highlight"><pre class="highlight"><code><span class="p">[</span><span class="w">
</span><span class="p">{</span><span class="w">
</span><span class="nl">"A"</span><span class="p">:</span><span class="w"> </span><span class="p">[</span><span class="w">
</span><span class="s2">"B"</span><span class="p">,</span><span class="w">
</span><span class="s2">"C"</span><span class="w">
</span><span class="p">]</span><span class="w">
</span><span class="p">}</span><span class="w">
</span><span class="p">]</span><span class="w">
</span></code></pre></div></div>
<p>The expression above would fail to transform the string to json because it would look like this and it is an invalid json:</p>
<div class="language-json highlighter-rouge"><div class="highlight"><pre class="highlight"><code><span class="p">[</span><span class="w">
</span><span class="p">{</span><span class="w">
</span><span class="nl">"A"</span><span class="p">:</span><span class="w"> </span><span class="s2">"B"</span><span class="p">,</span><span class="w">
</span><span class="s2">"C"</span><span class="w">
</span><span class="p">}</span><span class="w">
</span><span class="p">]</span><span class="w">
</span></code></pre></div></div>Ondrej JudaI want to write a follow-up for one of my previous posts Remove variables from apply to each action. I have been using this technique quite a lot and run into a problematic situation with nested arrays.Dataverse Batch Requests in Power Automate2022-10-30T22:00:00+00:002022-10-30T22:00:00+00:00https://blog.thenetw.org/2022/10/30/dataverse-batch-requests-in-power-automate<h2 id="the-issue">The Issue</h2>
<p>As a part of the implementation, we were creating thousands of rows in Dataverse from external source. Let me start with the fact, that Power Automate is not the best choice when it comes to this scenario, because of <a href="https://learn.microsoft.com/en-us/power-automate/limits-and-config#action-request-limits">the limits</a>.</p>
<p>Proper solution would be to deploy a server-less code that would perform this integration task into the Azure. You are getting scalability and pay as you go model with that which is exactly the thing you are probably looking for.</p>
<p>We decided to use Power Automate in the end because of the unified deployment model - through managed solution - and because the fact, that everyone can open up and change a Power Automate flow since it’s a tool with graphical and easy to use user interface.</p>
<p>No matter the choice, you’ll have to optimize your integration to avoid excessive api calls. <a href="https://learn.microsoft.com/en-us/power-platform/admin/api-request-limits-allocations">Read more about requests, limits and allocations in Power Platform</a>.</p>
<h2 id="the-solution">The Solution</h2>
<p>I performed a quick search and find out that every blogpost I saw is solving a batch operation in Power Automate through <code class="language-plaintext highlighter-rouge">Apply to Each</code> action. That means you do a separate API call for each record and you don’t save your actions per flow either.</p>
<p>So how to achieve a proper Dataverse batch request in Power Automate? There are two main rules you must follow.</p>
<h3 id="forbidden-apply-to-each">Forbidden Apply to Each</h3>
<p>You must avoid using <a href="https://learn.microsoft.com/en-us/power-automate/apply-to-each"><code class="language-plaintext highlighter-rouge">Apply to Each</code></a> action in your flow for transformation. If you’d use this action, you’ll iterate through every record there is. Sure, that works for a hundred of records. But imagine having a collection of 70k records. Are you able to determine when your flow is going to finish? How many actions will be evaluated? How many requests you’ll send?</p>
<p>Majority of your transformations can be solved by <a href="https://learn.microsoft.com/en-us/power-automate/data-operations#use-the-filter-array-action"><code class="language-plaintext highlighter-rouge">Filter Array</code></a> and <a href="https://learn.microsoft.com/en-us/power-automate/data-operations#use-the-select-action"><code class="language-plaintext highlighter-rouge">Select</code></a> actions instead of <code class="language-plaintext highlighter-rouge">Apply to Each</code>.</p>
<p>If you require more complex transformation, I advise you to use some template language for this. In our use case, we created custom connector that can resolve <a href="https://shopify.github.io/liquid/">Liquid template language</a>.</p>
<h3 id="the-batch-request">The Batch Request</h3>
<p><a href="https://learn.microsoft.com/en-us/connectors/commondataserviceforapps/">The Dataverse connector</a> doesn’t support a batch request. There’s an option to <a href="https://learn.microsoft.com/en-us/connectors/commondataserviceforapps/#perform-a-changeset-request">perform a changeset request</a>, but that’s something slightly different, it won’t save you any API calls. That’s where <a href="https://learn.microsoft.com/en-us/connectors/webcontents/">the HTTP with Azure AD connector</a> comes in play. This one is extremely useful, because it lets you call any service of your choice as long as you’re in your Azure Directory. This applies to Dataverse as well.</p>
<p>You won’t be able to build your batch request body without the <code class="language-plaintext highlighter-rouge">Apply to Each</code> action, if you can’t use external service (already mentioned liquid custom connector in our specific scenario).</p>
<h3 id="demo">Demo</h3>
<p>Bear with me…</p>
<p><img src="/uploads/2022/10/batch-request-power-automate.png" alt="Dataverse Batch Request in Power Automate" /></p>
<p>Let me start from the top. You can see <code class="language-plaintext highlighter-rouge">Liquid-Batch</code> action which is using the custom connector I’ve mentioned already. This connector has two inputs: <em>map</em> - liquid transformation and <em>entity</em> - data to be used for the transformation. We’re using it here to build the body of the batch request.</p>
<h4 id="red-rectangle">Red Rectangle</h4>
<p>This is where the magic happens, the iteration was moved from Power Automate to a tool that was designed for such thing - liquid. This is the reason, why we can avoid <code class="language-plaintext highlighter-rouge">Apply to Each</code> action and evaluate tens of thousands of records in seconds.</p>
<h4 id="green-rectangle">Green Rectangle</h4>
<p>This is the mapping. If the property is evaluated as a null, it’s inputted as a null value.</p>
<h4 id="orange-rectangle">Orange Rectangle</h4>
<p>These are the transformed data we want to import. I also added a property with the <code class="language-plaintext highlighter-rouge">batchId</code> generated in the first compose action.</p>
<h4 id="blue-rectangle">Blue Rectangle</h4>
<p>The final step. Sending the batch request against our Dataverse environment. Body is output of the <code class="language-plaintext highlighter-rouge">Liquid-Batch</code> action - body of our request as a string.</p>
<h2 id="tldr">TL;DR</h2>
<p>Just because you can do it, it doesn’t mean you have to. If you must use batch requests, then your task probably requires something built up for it…</p>
<p>I encourage you to look into <a href="https://learn.microsoft.com/en-us/power-query/dataflows/overview-dataflows-across-power-platform-dynamics-365">dataflows</a>, because that’s another option if you’re not into writing code.</p>Jan KostejnThe IssueThere was a problem refreshing the dataflow2022-08-22T09:00:00+00:002022-08-22T09:00:00+00:00https://blog.thenetw.org/2022/08/22/dataflow-unspecified-error<p>Lately, I got my hands on <a href="https://docs.microsoft.com/en-us/power-apps/maker/data-platform/self-service-data-prep-with-dataflows" target="_blank">Power Apps Power Query Dataflows</a>. It is a pretty handy tool for migrating, transforming, and importing data. I suggest you to try it for yourself. Even though it is a helpful tool, I must admit that I didn’t have a good experience with it when trying to put it through <a href="https://docs.microsoft.com/en-us/power-platform/alm/overview-alm" target="_blank">Application Lifecycle Management</a> and deploy it using Azure Pipelines. But this is not the topic of this article. I want to show you an error I ran into.</p>
<p><img src="/uploads/2022/08/2022-08-22-dataflow-unspecified-error-01.png" alt="Error" /></p>
<p>As you can see, the error tells you nothing about what is happening. It happened when I finished data transformation, mapped columns to my table in Dataverse, and tried to import the data. Since I didn’t know what it was about, I had to remove data transformation steps one by one to find out what was wrong. Fortunately, it didn’t take long.</p>
<p>The problem was caused by the mapping of <a href="https://docs.microsoft.com/en-us/power-apps/developer/data-platform/define-alternate-keys-entity" target="_blank">alternate key</a> on lookup. These keys are essential, If you want to map a lookup. It is used instead of the unique id of a row. Without it, the lookup won’t even show on the mapping page. In my example, I was importing expenses from a CSV file. On the expense in Dataverse, I wanted to hold information about measurement units - liters, kilograms, pieces,… At the moment, when I populated the key for the unit and refreshed the dataflows, the error appeared.</p>
<p><img src="/uploads/2022/08/2022-08-22-dataflow-unspecified-error-02.png" alt="Mapping" /></p>
<p>I went to check back on the alternate key for the Measurement Unit table and I found, that it had some status and it said <strong>Failed</strong>. When you create an alternate key, it needs to go through some initialization process before you can use it properly and for some reason, this one failed.</p>
<p><img src="/uploads/2022/08/2022-08-22-dataflow-unspecified-error-03.png" alt="Alternate key failed" /></p>
<p>To cut it short, the problem was in data. I wanted to use a measurement unit symbol as an alternate key for mapping, but we had duplicate data in it. What I didn’t think about was that two units could have the same symbol.</p>
<p><img src="/uploads/2022/08/2022-08-22-dataflow-unspecified-error-04.png" alt="Duplicate symbol" /></p>
<p>My solution was to change the alternate key from symbol to name, the error disappeared and the dataflow started to work.</p>
<p><img src="/uploads/2022/08/2022-08-22-dataflow-unspecified-error-05.png" alt="Import succeeded" /></p>Ondrej JudaLately, I got my hands on Power Apps Power Query Dataflows. It is a pretty handy tool for migrating, transforming, and importing data. I suggest you to try it for yourself. Even though it is a helpful tool, I must admit that I didn’t have a good experience with it when trying to put it through Application Lifecycle Management and deploy it using Azure Pipelines. But this is not the topic of this article. I want to show you an error I ran into.ALM vs. Power Automate2022-07-21T22:00:00+00:002022-07-21T22:00:00+00:00https://blog.thenetw.org/2022/07/21/alm-vs-power-automate<p>The only way how to achieve proper application lifecycle management (ALM) in Power Platform is to deploy everything through a managed solution. This is especially crucial if you have a product that you are automatically deploying to all the customers with each release. Power Platform consists of multiple products / services - let us take look on what obstacles you will be facing if you would like to achieve mentioned in Power Automate.</p>
<h2 id="disclaimer">Disclaimer</h2>
<p>This blog post is not a guide on how to setup the pipelines, but rather a summary of issues, you come across when deploying managed solutions with Power Automate related components. These can be deployed manually solution by solution, manually through PackageDeployer, or automatically through an automated pipeline (you can use official <a href="https://docs.microsoft.com/en-us/power-platform/alm/devops-build-tool-tasks#power-platform-deploy-package">build tools</a> or you can use <a href="https://github.com/WaelHamze/dyn365-ce-vsts-tasks">Power DevOps Tools</a>).</p>
<h2 id="terms">Terms</h2>
<p>First, we should align on the terms, so we speak in the same language.</p>
<h3 id="connections">Connections</h3>
<p>Connections are used by connectors to authenticate and authorize against the remote API or service in general. If you select a new connector in your flow, you must sign in and that creates a connection (some connectors do not require you to sign in). This connection is automatically getting a valid token until you change the password / secret.
<img src="/uploads/2022/07/2022-07-22-alm-vs-power-automate_new-connection.png" alt="New connection" /></p>
<h3 id="connection-references">Connection References</h3>
<p>Connection reference is basically a container for connection. The thing is you do not want to edit your managed flow just to provide the connection, but rather only configure the connection reference that is being used in that flow. You <strong>would not be able to use managed cloud flows without the use of connection references</strong>.</p>
<h3 id="cloud-flows">Cloud Flows</h3>
<p><a href="https://docs.microsoft.com/en-us/power-automate/overview-cloud">Cloud flow</a> is set of actions in Power Automate. It is a way of performing asynchronous logic on the server through user friendly interface. Be sure to always create a flow in a solution. If you do that, the <a href="#connection-references">connection references</a> are automatically created in that solution and you do not have to think about it.</p>
<h3 id="environment-variables">Environment Variables</h3>
<p>Environment variables can be used for specific environment configuration. Your logic may differ on testing and on production environments for example. Find more in <a href="https://docs.microsoft.com/en-us/power-apps/maker/data-platform/environmentvariables">documentation</a>. Each environment variable has a default value, and you can set a current value for a specific environment. These can be also set through managed solutions.</p>
<h3 id="custom-connectors">Custom Connectors</h3>
<p><a href="https://docs.microsoft.com/en-us/connectors/custom-connectors/define-blank">Custom connector</a> is basically <em>Power Automate</em> API wrapper, so you do not have to write any HTTP requests, but rather use visual editor. You can select your custom connector and then add an action with predefined inputs. Once the result is back, you can work with the outputs in the cloud flow how you are used to.</p>
<h2 id="configuration">Configuration</h2>
<h3 id="deploy-the-application-product">Deploy the Application (Product)</h3>
<p>First, you need to deploy your solutions. Everything should be deployed as a managed solution, without the need to manually edit anything (and create unmanaged customizations).</p>
<h3 id="set-current-environment-values-through-import-of-managed-solution">Set Current Environment Values (Through Import of Managed Solution)</h3>
<p>Environment variables can be used in cloud flows. The issue is that if you want to overwrite the default value, you must do that through managed import.</p>
<p>Imagine that your managed cloud flow is using environment variable. That means the <code class="language-plaintext highlighter-rouge">definition/parameters</code> property of the cloud flow definition has the environment variable definition:
<img src="/uploads/2022/07/2022-07-22-alm-vs-power-automate_environment-variable-in-flow.png" alt="Environment variable definition in the cloud flow" /></p>
<p>What if you want this parameter to be automatically updated with the change of environment variable current value? Follow these steps:</p>
<h4 id="fully-managed-environment">Fully managed environment</h4>
<ol>
<li>Change the environment variable’s current value through update of the <code class="language-plaintext highlighter-rouge">environmentvariablevalues.json</code> file in the managed solution with the environment variable
<ol>
<li>Do not forget to change the <code class="language-plaintext highlighter-rouge">@environmentvariablevalueid</code> GUID as well, otherwise your change may not be applied (for example if someone deleted the current value from a downstream environment)
<img src="/uploads/2022/07/2022-07-22-alm-vs-power-automate_environment-variable-update.png" alt="Update the environment variable's current value" /></li>
</ol>
</li>
<li>You are done; test your flow</li>
</ol>
<h4 id="changing-the-environment-variables-current-value-through-ui-on-a-downstream-environment">Changing the environment variable’s current value through UI on a downstream environment</h4>
<ol>
<li>Change the environment variable current value
<img src="/uploads/2022/07/2022-07-22-alm-vs-power-automate_environment-variable-update-2.png" alt="Update the environment variable's current value" /></li>
<li>Deploy the managed solution with the cloud flow again
<ol>
<li>It can be the original solution you have deployed the cloud flow with, but it needs to go through import to propagate the change</li>
</ol>
</li>
<li>You are done; test your flow</li>
</ol>
<p>You can clearly see from this example, that making unmanaged changes directly on the environment may require you to take additional steps… That is why your product should be always fully managed.</p>
<h3 id="create-connections">Create Connections</h3>
<p>These cannot be created automatically during the import currently. That means someone with interactive access must sign in and <a href="https://docs.microsoft.com/en-us/power-automate/add-manage-connections#add-a-connection">create the connections</a>. If you are using <a href="#connection-references">connection references</a> then it is very simple to create all connections, because you <a href="#assign-connections-to-connection-references">can see all of them in default solution</a>.</p>
<h3 id="assign-connections-to-connection-references">Assign Connections to Connection References</h3>
<p>If you import the solution manually, there is a connection references dialogue that will guide you through connection assignment. However, if your deployments are automated, you have to do that manually on a downstream environment.</p>
<ol>
<li>Go to <a href="https://make.powerapps.com/">make.powerapps.com</a></li>
<li>Choose the right environment</li>
<li>Select <em>Solutions > Default Solution</em></li>
<li>Use <em>Connection references</em> component filter</li>
<li>(Create and) assign connections one by one.</li>
</ol>
<h2 id="issues">Issues</h2>
<p>If you deploy manually (through interactive user), then you probably do not have any issue. However, if your deployments are automated through application user, you probably experience some - if not all - of these issues.</p>
<h3 id="flows-are-getting-turned-off">Flows Are Getting Turned Off</h3>
<p>There is a license check as part of the import service. Since the application user (used for deployments) is unlicensed, the import service automatically turns off the flows. This issue will be probably fixed <a href="https://docs.microsoft.com/en-us/power-platform-release-plan/2022wave1/power-automate/ownership-supported-service-principals">in the following months</a>. In the meantime, you will have to automate turning on the flows after the deploy yourself.</p>
<p>I suggest you to read <a href="https://www.develop1.net/public/post/2021/04/01/connection-references-with-alm-mind-the-gap">this blog post</a> where they are using <code class="language-plaintext highlighter-rouge">Microsoft.PowerApps.Administration.PowerShell</code> module to get connections on the environment. Once you have the connection, you can see who created them (Created By) and enable the flow impersonated as this user.</p>
<p>We took slightly different approach. We moved this process from pipeline to the deploy package. That means it works from our local machines and from pipelines without the need to execute custom scripts before or after the deploy. I will explain the idea and provide some snippets:</p>
<ol>
<li>Deploy package has the <code class="language-plaintext highlighter-rouge">Import.cs</code> file, where you can find <code class="language-plaintext highlighter-rouge">AfterPrimaryImport</code> function
<ol>
<li>This is executed in the context of import (application) user</li>
</ol>
</li>
<li>Our custom function gets called after the import from <code class="language-plaintext highlighter-rouge">AfterPrimaryImport</code>
<ol>
<li>PkgFolder is scanned and list of all <code class="language-plaintext highlighter-rouge">workflows</code> (this includes cloud flows) from all solutions is returned (<a href="#getworkflowstatesfromsolutions">code snippet</a>)</li>
<li><code class="language-plaintext highlighter-rouge">CallerId</code> propery of <code class="language-plaintext highlighter-rouge">CrmSvc</code> client is set to user who owns the <a href="#create-connections">connections</a></li>
<li>Now the <code class="language-plaintext highlighter-rouge">SetStateRequest</code> is executed with the states read from the solutions for each workflow under impersonated interactive user who owns the connections (<a href="#setworkflowstate">code snippet</a>)</li>
<li>Cloud flows are turned on or off based on the metadata in the solution</li>
</ol>
</li>
</ol>
<h4 id="getworkflowstatesfromsolutions">GetWorkflowStatesFromSolutions</h4>
<div class="language-cs highlighter-rouge"><div class="highlight"><pre class="highlight"><code><span class="c1">/// <summary></span>
<span class="c1">/// Returns List<KeyValuePair<Guid, bool>> of workflow states from solutions in the folder provided where key is workflow id and value is bool if workflow is enabled or not.</span>
<span class="c1">/// </summary></span>
<span class="c1">/// <param name="pathToFolderWithSolutions">Path to folder containing all solutions we want to go through.</param></span>
<span class="c1">/// <returns></returns></span>
<span class="k">public</span> <span class="k">static</span> <span class="n">List</span><span class="p"><</span><span class="n">KeyValuePair</span><span class="p"><</span><span class="n">Guid</span><span class="p">,</span> <span class="kt">bool</span><span class="p">>></span> <span class="nf">GetWorkflowStatesFromSolutions</span><span class="p">(</span><span class="kt">string</span> <span class="n">pathToFolderWithSolutions</span><span class="p">)</span>
<span class="p">{</span>
<span class="n">IEnumerable</span><span class="p"><</span><span class="kt">string</span><span class="p">></span> <span class="n">zipFiles</span> <span class="p">=</span> <span class="n">Directory</span><span class="p">.</span><span class="nf">GetFiles</span><span class="p">(</span><span class="n">pathToFolderWithSolutions</span><span class="p">).</span><span class="nf">Where</span><span class="p">(</span><span class="n">x</span> <span class="p">=></span> <span class="n">x</span><span class="p">.</span><span class="nf">EndsWith</span><span class="p">(</span><span class="s">".zip"</span><span class="p">));</span>
<span class="n">List</span><span class="p"><</span><span class="n">KeyValuePair</span><span class="p"><</span><span class="n">Guid</span><span class="p">,</span> <span class="kt">bool</span><span class="p">>></span> <span class="n">enabledFlows</span> <span class="p">=</span> <span class="k">new</span> <span class="n">List</span><span class="p"><</span><span class="n">KeyValuePair</span><span class="p"><</span><span class="n">Guid</span><span class="p">,</span> <span class="kt">bool</span><span class="p">>>();</span>
<span class="n">zipFiles</span><span class="p">.</span><span class="nf">ToList</span><span class="p">().</span><span class="nf">ForEach</span><span class="p">(</span>
<span class="n">x</span> <span class="p">=></span>
<span class="p">{</span>
<span class="k">using</span> <span class="p">(</span><span class="n">ZipArchive</span> <span class="n">zipArchive</span> <span class="p">=</span> <span class="k">new</span> <span class="nf">ZipArchive</span><span class="p">(</span><span class="k">new</span> <span class="nf">MemoryStream</span><span class="p">(</span><span class="n">File</span><span class="p">.</span><span class="nf">ReadAllBytes</span><span class="p">(</span><span class="n">x</span><span class="p">))))</span>
<span class="p">{</span>
<span class="n">ZipArchiveEntry</span> <span class="n">customizationsXml</span> <span class="p">=</span> <span class="n">zipArchive</span><span class="p">.</span><span class="n">Entries</span><span class="p">.</span><span class="nf">FirstOrDefault</span><span class="p">(</span>
<span class="n">y</span> <span class="p">=></span> <span class="n">y</span><span class="p">.</span><span class="n">FullName</span><span class="p">.</span><span class="nf">Equals</span><span class="p">(</span><span class="s">"customizations.xml"</span><span class="p">,</span> <span class="n">StringComparison</span><span class="p">.</span><span class="n">OrdinalIgnoreCase</span><span class="p">));</span>
<span class="k">if</span> <span class="p">(</span><span class="n">customizationsXml</span> <span class="p">==</span> <span class="k">null</span> <span class="p">||</span> <span class="n">customizationsXml</span> <span class="p">==</span> <span class="k">default</span><span class="p">(</span><span class="n">ZipArchiveEntry</span><span class="p">))</span>
<span class="p">{</span>
<span class="c1">// not a solutions</span>
<span class="k">return</span><span class="p">;</span>
<span class="p">}</span>
<span class="n">Customizations</span> <span class="n">customizations</span> <span class="p">=</span> <span class="k">new</span> <span class="nf">Customizations</span><span class="p">(</span><span class="n">XDocument</span><span class="p">.</span><span class="nf">Load</span><span class="p">(</span><span class="n">customizationsXml</span><span class="p">.</span><span class="nf">Open</span><span class="p">()));</span>
<span class="n">enabledFlows</span><span class="p">.</span><span class="nf">AddRange</span><span class="p">(</span>
<span class="n">customizations</span><span class="p">.</span><span class="n">Workflows</span><span class="p">.</span><span class="nf">Select</span><span class="p">(</span><span class="n">y</span> <span class="p">=></span> <span class="k">new</span> <span class="n">KeyValuePair</span><span class="p"><</span><span class="n">Guid</span><span class="p">,</span> <span class="kt">bool</span><span class="p">>(</span><span class="n">y</span><span class="p">.</span><span class="n">WorkflowId</span><span class="p">,</span> <span class="n">Convert</span><span class="p">.</span><span class="nf">ToBoolean</span><span class="p">((</span><span class="kt">int</span><span class="p">)</span><span class="n">y</span><span class="p">.</span><span class="n">StateCode</span><span class="p">))));</span>
<span class="p">}</span>
<span class="p">});</span>
<span class="k">return</span> <span class="n">enabledFlows</span><span class="p">;</span>
<span class="p">}</span>
</code></pre></div></div>
<h4 id="setworkflowstate">SetWorkflowState</h4>
<div class="language-cs highlighter-rouge"><div class="highlight"><pre class="highlight"><code><span class="c1">/// <summary></span>
<span class="c1">/// Enable or disable Dataverse workflows (flows in solutions). </span>
<span class="c1">/// </summary></span>
<span class="c1">/// <param name="crmServiceClient">Client to work with Dataverse environment.</param></span>
<span class="c1">/// <param name="workflowId">Provide id of workflow that you want to activate or deactivate</param></span>
<span class="c1">/// <param name="enabled">Enable workflows => true. Disable workflows => false.</param></span>
<span class="k">public</span> <span class="k">static</span> <span class="k">void</span> <span class="nf">SetWorkflowState</span><span class="p">(</span><span class="n">CrmServiceClient</span> <span class="n">crmServiceClient</span><span class="p">,</span> <span class="n">Guid</span> <span class="n">workflowId</span><span class="p">,</span> <span class="kt">bool</span> <span class="n">enabled</span> <span class="p">=</span> <span class="k">true</span><span class="p">)</span>
<span class="p">{</span>
<span class="n">Guid</span> <span class="n">originallCallerId</span> <span class="p">=</span> <span class="n">crmServiceClient</span><span class="p">.</span><span class="n">CallerId</span><span class="p">;</span>
<span class="n">ConnectionReference</span> <span class="n">connectionReference</span> <span class="p">=</span> <span class="k">new</span> <span class="nf">ConnectionReference</span><span class="p">(</span><span class="s">"talxis_sharedcommondataserviceforapps_dataverse"</span><span class="p">,</span> <span class="n">crmServiceClient</span><span class="p">);</span>
<span class="k">if</span> <span class="p">(</span><span class="n">connectionReference</span><span class="p">.</span><span class="n">AssignedBy</span> <span class="p">!=</span> <span class="k">null</span> <span class="p">&&</span> <span class="n">connectionReference</span><span class="p">.</span><span class="n">AssignedBy</span> <span class="p">!=</span> <span class="k">default</span><span class="p">)</span>
<span class="p">{</span>
<span class="n">crmServiceClient</span><span class="p">.</span><span class="n">CallerId</span> <span class="p">=</span> <span class="n">connectionReference</span><span class="p">.</span><span class="n">AssignedBy</span><span class="p">.</span><span class="n">Id</span><span class="p">;</span>
<span class="p">}</span>
<span class="n">SetStateRequest</span> <span class="n">setStateRequest</span> <span class="p">=</span> <span class="k">new</span> <span class="n">SetStateRequest</span>
<span class="p">{</span>
<span class="n">EntityMoniker</span> <span class="p">=</span> <span class="k">new</span> <span class="nf">EntityReference</span><span class="p">(</span><span class="n">WorkflowEntityName</span><span class="p">,</span> <span class="n">workflowId</span><span class="p">),</span>
<span class="n">State</span> <span class="p">=</span> <span class="n">enabled</span> <span class="p">?</span> <span class="k">new</span> <span class="nf">OptionSetValue</span><span class="p">(</span><span class="m">1</span><span class="p">)</span> <span class="p">:</span> <span class="k">new</span> <span class="nf">OptionSetValue</span><span class="p">(</span><span class="m">0</span><span class="p">),</span>
<span class="n">Status</span> <span class="p">=</span> <span class="n">enabled</span> <span class="p">?</span> <span class="k">new</span> <span class="nf">OptionSetValue</span><span class="p">(</span><span class="m">2</span><span class="p">)</span> <span class="p">:</span> <span class="k">new</span> <span class="nf">OptionSetValue</span><span class="p">(</span><span class="m">1</span><span class="p">)</span>
<span class="p">};</span>
<span class="n">SetStateResponse</span> <span class="n">setStateResponse</span> <span class="p">=</span> <span class="p">(</span><span class="n">SetStateResponse</span><span class="p">)</span><span class="n">crmServiceClient</span><span class="p">.</span><span class="nf">Execute</span><span class="p">(</span><span class="n">setStateRequest</span><span class="p">);</span>
<span class="n">crmServiceClient</span><span class="p">.</span><span class="n">CallerId</span> <span class="p">=</span> <span class="n">originallCallerId</span><span class="p">;</span>
<span class="p">}</span>
</code></pre></div></div>
<p>The trickiest part was how to get the connection owner, when you do not have access to Power Apps Administration APIs from the <code class="language-plaintext highlighter-rouge">CrmSvc</code> client. We started with <em>Modified By</em> attribute of the <code class="language-plaintext highlighter-rouge">connectionreference</code>, but the issue there is that with each solution upgrade, the <em>Modified By</em> changes back to the application user (user performing the import of the solution). Another idea was to add <em>Assigned By</em> lookup to <code class="language-plaintext highlighter-rouge">systemuser</code> to <code class="language-plaintext highlighter-rouge">connectionreference</code> entity, but this entity is not customizable. The solution we are using now is far from perfect, but works as required:</p>
<ol>
<li>Custom entity <em>Connection Reference Assignment</em> was created</li>
<li>Synchronous workflow was added
<ol>
<li>Triggered by a create or an update operation of <code class="language-plaintext highlighter-rouge">connectionreference</code></li>
<li>If there is <code class="language-plaintext highlighter-rouge">connectionid</code> attribute filled, the workflow creates <em>Connection Reference Assignment</em></li>
<li>This record contains the connection reference name, owner of the connection and date of the change
<ol>
<li>Our custom class has getters for these properties as seen in <a href="#setworkflowstate">the code snippet</a></li>
</ol>
</li>
</ol>
</li>
</ol>
<h3 id="custom-connectors-are-returning-unauthorized">Custom Connectors Are Returning ‘Unauthorized’</h3>
<p>If you are using OAuth 2.0 in your custom connector, then your custom connectors might return unauthorized after the solution upgrade of the connector. For some reason, the upgrade deletes <code class="language-plaintext highlighter-rouge">clientId</code> and <code class="language-plaintext highlighter-rouge">clientSecret</code> parameters from your <code class="language-plaintext highlighter-rouge">{customConnectorName}_connectionparameters.json</code> file and then the connector cannot get a valid token.</p>
<p>This may be fixed by the platform team already, but if you are experiencing this issue, use <a href="https://docs.microsoft.com/en-us/connectors/custom-connectors/environment-variables#use-an-environment-variable-in-a-custom-connector">environment variables</a> for these values instead.</p>
<h4 id="sample-customconnectorname_connectionparametersjson">Sample {customConnectorName}_connectionparameters.json</h4>
<div class="language-json highlighter-rouge"><div class="highlight"><pre class="highlight"><code><span class="p">{</span><span class="w">
</span><span class="nl">"token"</span><span class="p">:</span><span class="w"> </span><span class="p">{</span><span class="w">
</span><span class="nl">"type"</span><span class="p">:</span><span class="w"> </span><span class="s2">"oauthSetting"</span><span class="p">,</span><span class="w">
</span><span class="nl">"oAuthSettings"</span><span class="p">:</span><span class="w"> </span><span class="p">{</span><span class="w">
</span><span class="nl">"identityProvider"</span><span class="p">:</span><span class="w"> </span><span class="s2">"aad"</span><span class="p">,</span><span class="w">
</span><span class="nl">"clientId"</span><span class="p">:</span><span class="w"> </span><span class="s2">"@environmentVariables(</span><span class="se">\"</span><span class="s2">talxis_connectors_datafeed_clientid</span><span class="se">\"</span><span class="s2">)"</span><span class="p">,</span><span class="w">
</span><span class="nl">"clientSecret"</span><span class="p">:</span><span class="w"> </span><span class="s2">"@environmentVariables(</span><span class="se">\"</span><span class="s2">talxis_connectors_datafeed_clientsecret</span><span class="se">\"</span><span class="s2">)"</span><span class="p">,</span><span class="w">
</span><span class="nl">"scopes"</span><span class="p">:</span><span class="w"> </span><span class="p">[],</span><span class="w">
</span><span class="nl">"redirectMode"</span><span class="p">:</span><span class="w"> </span><span class="s2">"Global"</span><span class="p">,</span><span class="w">
</span><span class="nl">"redirectUrl"</span><span class="p">:</span><span class="w"> </span><span class="s2">"https://global.consent.azure-apim.net/redirect"</span><span class="p">,</span><span class="w">
</span><span class="nl">"properties"</span><span class="p">:</span><span class="w"> </span><span class="p">{</span><span class="w">
</span><span class="nl">"IsFirstParty"</span><span class="p">:</span><span class="w"> </span><span class="s2">"False"</span><span class="p">,</span><span class="w">
</span><span class="nl">"AzureActiveDirectoryResourceId"</span><span class="p">:</span><span class="w"> </span><span class="s2">"@environmentVariables(</span><span class="se">\"</span><span class="s2">talxis_connectors_datafeed_resourceuri</span><span class="se">\"</span><span class="s2">)"</span><span class="w">
</span><span class="p">},</span><span class="w">
</span><span class="nl">"customParameters"</span><span class="p">:</span><span class="w"> </span><span class="p">{</span><span class="w">
</span><span class="nl">"loginUri"</span><span class="p">:</span><span class="w"> </span><span class="p">{</span><span class="w">
</span><span class="nl">"value"</span><span class="p">:</span><span class="w"> </span><span class="s2">"https://login.windows.net"</span><span class="w">
</span><span class="p">},</span><span class="w">
</span><span class="nl">"tenantId"</span><span class="p">:</span><span class="w"> </span><span class="p">{</span><span class="w">
</span><span class="nl">"value"</span><span class="p">:</span><span class="w"> </span><span class="s2">"common"</span><span class="w">
</span><span class="p">},</span><span class="w">
</span><span class="nl">"resourceUri"</span><span class="p">:</span><span class="w"> </span><span class="p">{</span><span class="w">
</span><span class="nl">"value"</span><span class="p">:</span><span class="w"> </span><span class="s2">"@environmentVariables(</span><span class="se">\"</span><span class="s2">talxis_connectors_datafeed_resourceuri</span><span class="se">\"</span><span class="s2">)"</span><span class="w">
</span><span class="p">}</span><span class="w">
</span><span class="p">},</span><span class="w">
</span><span class="nl">"token:clientId"</span><span class="p">:</span><span class="w"> </span><span class="p">{</span><span class="w">
</span><span class="nl">"type"</span><span class="p">:</span><span class="w"> </span><span class="s2">"string"</span><span class="p">,</span><span class="w">
</span><span class="nl">"uiDefinition"</span><span class="p">:</span><span class="w"> </span><span class="p">{</span><span class="w">
</span><span class="nl">"displayName"</span><span class="p">:</span><span class="w"> </span><span class="s2">"Client ID"</span><span class="p">,</span><span class="w">
</span><span class="nl">"description"</span><span class="p">:</span><span class="w"> </span><span class="s2">"Client (or Application) ID of the Azure Active Directory application."</span><span class="p">,</span><span class="w">
</span><span class="nl">"constraints"</span><span class="p">:</span><span class="w"> </span><span class="p">{</span><span class="w">
</span><span class="nl">"required"</span><span class="p">:</span><span class="w"> </span><span class="s2">"false"</span><span class="p">,</span><span class="w">
</span><span class="nl">"hidden"</span><span class="p">:</span><span class="w"> </span><span class="s2">"true"</span><span class="w">
</span><span class="p">}</span><span class="w">
</span><span class="p">},</span><span class="w">
</span><span class="nl">"token:clientSecret"</span><span class="p">:</span><span class="w"> </span><span class="p">{</span><span class="w">
</span><span class="nl">"type"</span><span class="p">:</span><span class="w"> </span><span class="s2">"securestring"</span><span class="p">,</span><span class="w">
</span><span class="nl">"uiDefinition"</span><span class="p">:</span><span class="w"> </span><span class="p">{</span><span class="w">
</span><span class="nl">"displayName"</span><span class="p">:</span><span class="w"> </span><span class="s2">"Client Secret"</span><span class="p">,</span><span class="w">
</span><span class="nl">"description"</span><span class="p">:</span><span class="w"> </span><span class="s2">"Client secret of the Azure Active Directory application."</span><span class="p">,</span><span class="w">
</span><span class="nl">"constraints"</span><span class="p">:</span><span class="w"> </span><span class="p">{</span><span class="w">
</span><span class="nl">"required"</span><span class="p">:</span><span class="w"> </span><span class="s2">"false"</span><span class="p">,</span><span class="w">
</span><span class="nl">"hidden"</span><span class="p">:</span><span class="w"> </span><span class="s2">"true"</span><span class="w">
</span><span class="p">}</span><span class="w">
</span><span class="p">},</span><span class="w">
</span><span class="nl">"token:TenantId"</span><span class="p">:</span><span class="w"> </span><span class="p">{</span><span class="w">
</span><span class="nl">"type"</span><span class="p">:</span><span class="w"> </span><span class="s2">"string"</span><span class="p">,</span><span class="w">
</span><span class="nl">"metadata"</span><span class="p">:</span><span class="w"> </span><span class="p">{</span><span class="w">
</span><span class="nl">"sourceType"</span><span class="p">:</span><span class="w"> </span><span class="s2">"AzureActiveDirectoryTenant"</span><span class="w">
</span><span class="p">},</span><span class="w">
</span><span class="nl">"uiDefinition"</span><span class="p">:</span><span class="w"> </span><span class="p">{</span><span class="w">
</span><span class="nl">"displayName"</span><span class="p">:</span><span class="w"> </span><span class="s2">"Tenant"</span><span class="p">,</span><span class="w">
</span><span class="nl">"description"</span><span class="p">:</span><span class="w"> </span><span class="s2">"The tenant ID of for the Azure Active Directory application"</span><span class="p">,</span><span class="w">
</span><span class="nl">"constraints"</span><span class="p">:</span><span class="w"> </span><span class="p">{</span><span class="w">
</span><span class="nl">"required"</span><span class="p">:</span><span class="w"> </span><span class="s2">"false"</span><span class="p">,</span><span class="w">
</span><span class="nl">"hidden"</span><span class="p">:</span><span class="w"> </span><span class="s2">"true"</span><span class="w">
</span><span class="p">}</span><span class="w">
</span><span class="p">},</span><span class="w">
</span><span class="nl">"token:resourceUri"</span><span class="p">:</span><span class="w"> </span><span class="p">{</span><span class="w">
</span><span class="nl">"type"</span><span class="p">:</span><span class="w"> </span><span class="s2">"string"</span><span class="p">,</span><span class="w">
</span><span class="nl">"uiDefinition"</span><span class="p">:</span><span class="w"> </span><span class="p">{</span><span class="w">
</span><span class="nl">"displayName"</span><span class="p">:</span><span class="w"> </span><span class="s2">"ResourceUri"</span><span class="p">,</span><span class="w">
</span><span class="nl">"description"</span><span class="p">:</span><span class="w"> </span><span class="s2">"The resource you are requesting authorization to use."</span><span class="p">,</span><span class="w">
</span><span class="nl">"constraints"</span><span class="p">:</span><span class="w"> </span><span class="p">{</span><span class="w">
</span><span class="nl">"required"</span><span class="p">:</span><span class="w"> </span><span class="s2">"false"</span><span class="p">,</span><span class="w">
</span><span class="nl">"hidden"</span><span class="p">:</span><span class="w"> </span><span class="s2">"true"</span><span class="w">
</span><span class="p">}</span><span class="w">
</span><span class="p">},</span><span class="w">
</span><span class="nl">"token:grantType"</span><span class="p">:</span><span class="w"> </span><span class="p">{</span><span class="w">
</span><span class="nl">"type"</span><span class="p">:</span><span class="w"> </span><span class="s2">"string"</span><span class="p">,</span><span class="w">
</span><span class="nl">"allowedValues"</span><span class="p">:</span><span class="w"> </span><span class="p">[</span><span class="w">
</span><span class="p">{</span><span class="w">
</span><span class="nl">"value"</span><span class="p">:</span><span class="w"> </span><span class="s2">"code"</span><span class="w">
</span><span class="p">},</span><span class="w">
</span><span class="p">{</span><span class="w">
</span><span class="nl">"value"</span><span class="p">:</span><span class="w"> </span><span class="s2">"client_credentials"</span><span class="w">
</span><span class="p">}</span><span class="w">
</span><span class="p">],</span><span class="w">
</span><span class="nl">"uiDefinition"</span><span class="p">:</span><span class="w"> </span><span class="p">{</span><span class="w">
</span><span class="nl">"displayName"</span><span class="p">:</span><span class="w"> </span><span class="s2">"Grant Type"</span><span class="p">,</span><span class="w">
</span><span class="nl">"description"</span><span class="p">:</span><span class="w"> </span><span class="s2">"Grant type"</span><span class="p">,</span><span class="w">
</span><span class="nl">"constraints"</span><span class="p">:</span><span class="w"> </span><span class="p">{</span><span class="w">
</span><span class="nl">"required"</span><span class="p">:</span><span class="w"> </span><span class="s2">"false"</span><span class="p">,</span><span class="w">
</span><span class="nl">"hidden"</span><span class="p">:</span><span class="w"> </span><span class="s2">"true"</span><span class="p">,</span><span class="w">
</span><span class="nl">"allowedValues"</span><span class="p">:</span><span class="w"> </span><span class="p">[</span><span class="w">
</span><span class="p">{</span><span class="w">
</span><span class="nl">"text"</span><span class="p">:</span><span class="w"> </span><span class="s2">"Code"</span><span class="p">,</span><span class="w">
</span><span class="nl">"value"</span><span class="p">:</span><span class="w"> </span><span class="s2">"code"</span><span class="w">
</span><span class="p">},</span><span class="w">
</span><span class="p">{</span><span class="w">
</span><span class="nl">"text"</span><span class="p">:</span><span class="w"> </span><span class="s2">"Client Credentials"</span><span class="p">,</span><span class="w">
</span><span class="nl">"value"</span><span class="p">:</span><span class="w"> </span><span class="s2">"client_credentials"</span><span class="w">
</span><span class="p">}</span><span class="w">
</span><span class="p">]</span><span class="w">
</span><span class="p">}</span><span class="w">
</span></code></pre></div></div>Jan KostejnThe only way how to achieve proper application lifecycle management (ALM) in Power Platform is to deploy everything through a managed solution. This is especially crucial if you have a product that you are automatically deploying to all the customers with each release. Power Platform consists of multiple products / services - let us take look on what obstacles you will be facing if you would like to achieve mentioned in Power Automate.Calling Approval Follow ups via HTTP calls2022-06-27T13:00:00+00:002022-06-27T13:00:00+00:00https://blog.thenetw.org/2022/06/27/calling-approval-follow-ups-via-HTTP-calls<p>Recently, I encountered a case where I needed to send a Follow up via Power Automate Flow, to automatically notify users about pending Approvals. Let’s take a look at the possible solution.</p>
<h3 id="what-are-approvals-and-what-is-a-follow-up">What are Approvals and what is a Follow up?</h3>
<p>To quote Microsoft:</p>
<blockquote>
<p>Approvals in Microsoft Teams is a way to streamline all of your requests and processes with your team or partners.</p>
</blockquote>
<p>That is the basic gist. You send an Approval, and chosen Approver decides on whatever he wants to actually approve your approval, or reject it. Now, what is a Follow up? Again, let’s quote Microsoft:</p>
<blockquote>
<p>You can follow up on approval requests to remind people to take action. You can send a follow-up notification from the Sent list in the Approvals hub, or in the details of the approval itself.</p>
</blockquote>
<p>Follow up lets you notify the Approver that they have an Approval waiting for their response that was not yet provided. Quite handy, considering that the agenda these days is fully packed.</p>
<p>You can read more on Approvals <a href="https://support.microsoft.com/en-us/office/what-is-approvals-a9a01c95-e0bf-4d20-9ada-f7be3fc283d3">here</a>, <a href="https://powerautomate.microsoft.com/en-us/connectors/details/shared_approvals/approvals/">here</a> and <a href="https://support.microsoft.com/en-us/office/follow-up-on-your-approval-requests-in-teams-bb5206e9-407d-49fc-a136-c1e2a05a3ec9">here</a>.</p>
<h3 id="trigerring-follow-up-with-an-http-call">Trigerring Follow up with an HTTP call</h3>
<p>Now, normally, you would trigger a Follow up from Teams, from this button, located on the tab of a given Approval:
<img src="/uploads/2022/06/2022-06-27-calling-approval-follow-ups-via-HTTP-calls-01.png" alt="FollowUpButton" /> <br />
However, what if we wanted to trigger a Follow up a different way, so that we could use it, for example, in Power Automate Flow?
With a bit of Fiddler trickery, we can see what endpoint is called and what body is sent when triggering a Follow up.
The URL Teams is pointing at with a POST method is <br />
<code>https://approvals.teams.microsoft.com/api/sendReminder</code><br />
Cool, let’s peek into the body of the request:</p>
<div class="language-json highlighter-rouge"><div class="highlight"><pre class="highlight"><code><span class="p">{</span><span class="w">
</span><span class="nl">"ApprovalId"</span><span class="p">:</span><span class="s2">"<guid_of_the_approve>"</span><span class="p">,</span><span class="w">
</span><span class="nl">"Title"</span><span class="p">:</span><span class="s2">"TestNot"</span><span class="p">,</span><span class="w">
</span><span class="nl">"Requester"</span><span class="p">:</span><span class="s2">"<name_of_the_requester>"</span><span class="p">,</span><span class="w">
</span><span class="nl">"PendingApprovers"</span><span class="p">:[</span><span class="w">
</span><span class="s2">"<guid_of_an_approver>"</span><span class="w">
</span><span class="p">],</span><span class="w">
</span><span class="nl">"FlowEnvironment"</span><span class="p">:</span><span class="s2">"<guid_of_the_environment>"</span><span class="p">,</span><span class="w">
</span><span class="nl">"ApprovalCreator"</span><span class="p">:</span><span class="mi">0</span><span class="p">,</span><span class="w">
</span><span class="nl">"MessageId"</span><span class="p">:</span><span class="s2">""</span><span class="p">,</span><span class="w">
</span><span class="nl">"ConversationId"</span><span class="p">:</span><span class="s2">"N/A"</span><span class="w">
</span><span class="p">}</span><span class="w">
</span></code></pre></div></div>
<p>Now, we know how the call looks, and we can re-create this request in a flow. <br />
We will be using the HTTP with Azure AD connector (to ensure authentication), and its action Invoke an HTTP request. For this, we need to create an HTTP with Azure AD connection, that will look like this: <br />
<img src="/uploads/2022/06/2022-06-27-calling-approval-follow-ups-via-HTTP-calls-02.png" alt="Connections" /></p>
<div class="language-plaintext highlighter-rouge"><div class="highlight"><pre class="highlight"><code>Base Resource URL: https://approvals.teams.microsoft.com/
Azure AD Resource URI (Application ID URI): https://approvals.teams.microsoft.com/
</code></pre></div></div>
<p>Now, we can re-create our HTTP request. I found that you can cut a few lines from the body so, in the end, the request is a bit simpler.
The basic shot at the implementation can look like this: <br />
<img src="/uploads/2022/06/2022-06-27-calling-approval-follow-ups-via-HTTP-calls-05.png" alt="FirstImplemantation" /><br />
Now, we can fill in values from previous steps (e.g. from listing All Approvals and obtaining needed properties) and our final implementation can look something like this:<br />
<img src="/uploads/2022/06/2022-06-27-calling-approval-follow-ups-via-HTTP-calls-06.png" alt="Final" />.</p>
<p>We can see that in a correct call, the Output is an object with an ApprovalId.
Also, our Approver gets notified in Teams.</p>
<p><img src="/uploads/2022/06/2022-06-27-calling-approval-follow-ups-via-HTTP-calls-04.png" alt="Notified" /></p>
<h3 id="limitations-of-follow-ups">Limitations of Follow ups</h3>
<p>Currently, you cannot send follow ups to yourself (funny thing - there is a button for it in Teams, that literary does nothing, leading to some <a href="https://powerusers.microsoft.com/t5/General-Power-Automate/Approval-App-Follow-up-button-does-nothing/td-p/1184418">confusions</a>).</p>
<p>When called by an HTTP call, a Follow up for yourself gets made, however, the notifications insides, are, sadly, messed up.</p>
<p><img src="/uploads/2022/06/2022-06-27-calling-approval-follow-ups-via-HTTP-calls-03.png" alt="MessedUp" /></p>Daniel KleinRecently, I encountered a case where I needed to send a Follow up via Power Automate Flow, to automatically notify users about pending Approvals. Let’s take a look at the possible solution.