
ALM vs. Power Automate
The only way how to achieve proper application lifecycle management (ALM) in Power Platform is to deploy everything through a managed solution. This is especially crucial if you have a product that you are automatically deploying to all the customers with each release. Power Platform consists of multiple products / services - let us take look on what obstacles you will be facing if you would like to achieve mentioned in Power Automate.
Disclaimer
This blog post is not a guide on how to setup the pipelines, but rather a summary of issues, you come across when deploying managed solutions with Power Automate related components. These can be deployed manually solution by solution, manually through PackageDeployer, or automatically through an automated pipeline (you can use official build tools or you can use Power DevOps Tools).
Terms
First, we should align on the terms, so we speak in the same language.
Connections
Connections are used by connectors to authenticate and authorize against the remote API or service in general. If you select a new connector in your flow, you must sign in and that creates a connection (some connectors do not require you to sign in). This connection is automatically getting a valid token until you change the password / secret.
Connection References
Connection reference is basically a container for connection. The thing is you do not want to edit your managed flow just to provide the connection, but rather only configure the connection reference that is being used in that flow. You would not be able to use managed cloud flows without the use of connection references.
Cloud Flows
Cloud flow is set of actions in Power Automate. It is a way of performing asynchronous logic on the server through user friendly interface. Be sure to always create a flow in a solution. If you do that, the connection references are automatically created in that solution and you do not have to think about it.
Environment Variables
Environment variables can be used for specific environment configuration. Your logic may differ on testing and on production environments for example. Find more in documentation. Each environment variable has a default value, and you can set a current value for a specific environment. These can be also set through managed solutions.
Custom Connectors
Custom connector is basically Power Automate API wrapper, so you do not have to write any HTTP requests, but rather use visual editor. You can select your custom connector and then add an action with predefined inputs. Once the result is back, you can work with the outputs in the cloud flow how you are used to.
Configuration
Deploy the Application (Product)
First, you need to deploy your solutions. Everything should be deployed as a managed solution, without the need to manually edit anything (and create unmanaged customizations).
Set Current Environment Values (Through Import of Managed Solution)
Environment variables can be used in cloud flows. The issue is that if you want to overwrite the default value, you must do that through managed import.
Imagine that your managed cloud flow is using environment variable. That means the definition/parameters property of the cloud flow definition has the environment variable definition:
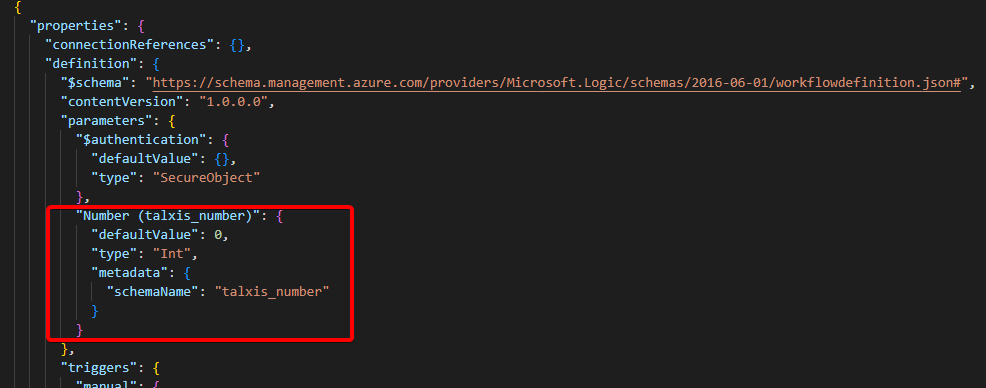
What if you want this parameter to be automatically updated with the change of environment variable current value? Follow these steps:
Fully managed environment
- Change the environment variable’s current value through update of the
environmentvariablevalues.jsonfile in the managed solution with the environment variable- Do not forget to change the
@environmentvariablevalueidGUID as well, otherwise your change may not be applied (for example if someone deleted the current value from a downstream environment)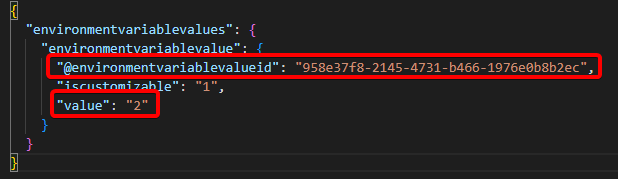
- Do not forget to change the
- You are done; test your flow
Changing the environment variable’s current value through UI on a downstream environment
- Change the environment variable current value
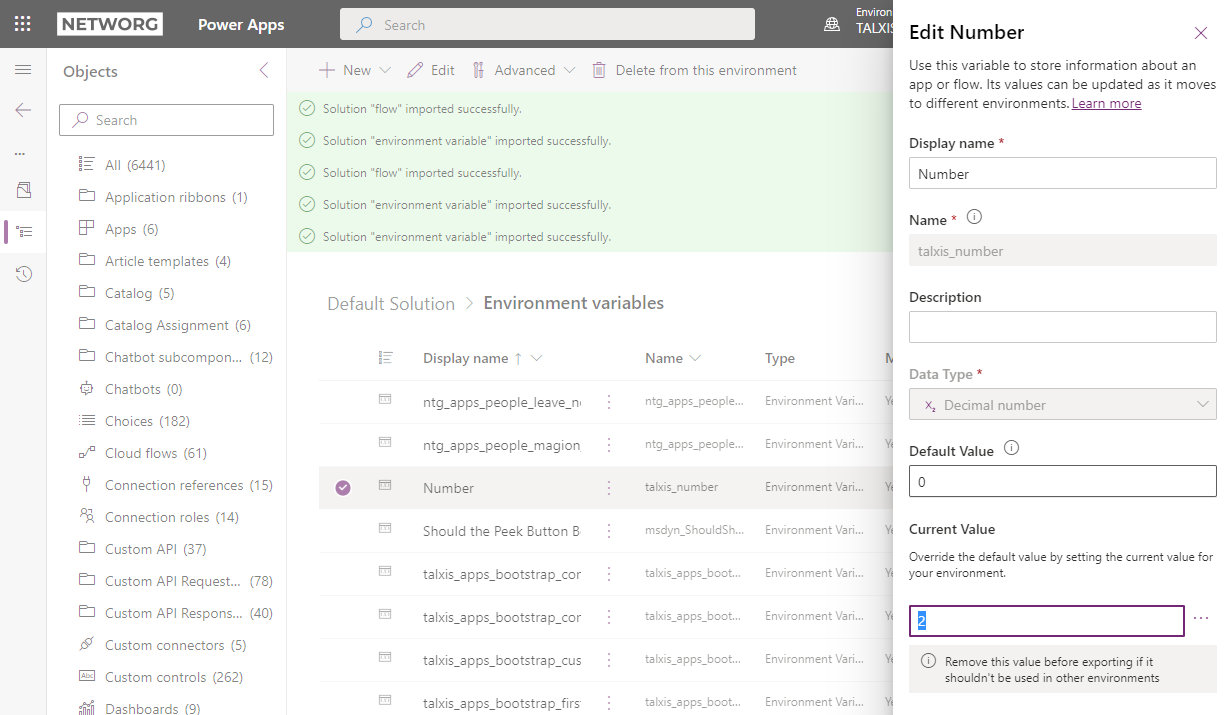
- Deploy the managed solution with the cloud flow again
- It can be the original solution you have deployed the cloud flow with, but it needs to go through import to propagate the change
- You are done; test your flow
You can clearly see from this example, that making unmanaged changes directly on the environment may require you to take additional steps… That is why your product should be always fully managed.
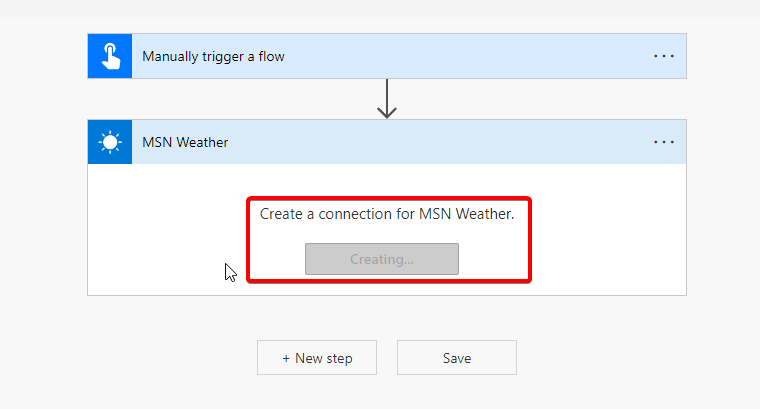
Create Connections
These cannot be created automatically during the import currently. That means someone with interactive access must sign in and create the connections. If you are using connection references then it is very simple to create all connections, because you can see all of them in default solution.
Assign Connections to Connection References
If you import the solution manually, there is a connection references dialogue that will guide you through connection assignment. However, if your deployments are automated, you have to do that manually on a downstream environment.
- Go to make.powerapps.com
- Choose the right environment
- Select Solutions > Default Solution
- Use Connection references component filter
- (Create and) assign connections one by one.
Issues
If you deploy manually (through interactive user), then you probably do not have any issue. However, if your deployments are automated through application user, you probably experience some - if not all - of these issues.
Flows Are Getting Turned Off
There is a license check as part of the import service. Since the application user (used for deployments) is unlicensed, the import service automatically turns off the flows. This issue will be probably fixed in the following months. In the meantime, you will have to automate turning on the flows after the deploy yourself.
I suggest you to read this blog post where they are using Microsoft.PowerApps.Administration.PowerShell module to get connections on the environment. Once you have the connection, you can see who created them (Created By) and enable the flow impersonated as this user.
We took slightly different approach. We moved this process from pipeline to the deploy package. That means it works from our local machines and from pipelines without the need to execute custom scripts before or after the deploy. I will explain the idea and provide some snippets:
- Deploy package has the
Import.csfile, where you can findAfterPrimaryImportfunction- This is executed in the context of import (application) user
- Our custom function gets called after the import from
AfterPrimaryImport- PkgFolder is scanned and list of all
workflows(this includes cloud flows) from all solutions is returned (code snippet) CallerIdpropery ofCrmSvcclient is set to user who owns the connections- Now the
SetStateRequestis executed with the states read from the solutions for each workflow under impersonated interactive user who owns the connections (code snippet) - Cloud flows are turned on or off based on the metadata in the solution
- PkgFolder is scanned and list of all
GetWorkflowStatesFromSolutions
/// <summary>
/// Returns List<KeyValuePair<Guid, bool>> of workflow states from solutions in the folder provided where key is workflow id and value is bool if workflow is enabled or not.
/// </summary>
/// <param name="pathToFolderWithSolutions">Path to folder containing all solutions we want to go through.</param>
/// <returns></returns>
public static List<KeyValuePair<Guid, bool>> GetWorkflowStatesFromSolutions(string pathToFolderWithSolutions)
{
    IEnumerable<string> zipFiles = Directory.GetFiles(pathToFolderWithSolutions).Where(x => x.EndsWith(".zip"));

    List<KeyValuePair<Guid, bool>> enabledFlows = new List<KeyValuePair<Guid, bool>>();
    zipFiles.ToList().ForEach(
        x =>
        {
            using (ZipArchive zipArchive = new ZipArchive(new MemoryStream(File.ReadAllBytes(x))))
            {
                ZipArchiveEntry customizationsXml = zipArchive.Entries.FirstOrDefault(
                    y => y.FullName.Equals("customizations.xml", StringComparison.OrdinalIgnoreCase));
                if (customizationsXml == null || customizationsXml == default(ZipArchiveEntry))
                {
                    // not a solutions
                    return;
                }
                Customizations customizations = new Customizations(XDocument.Load(customizationsXml.Open()));
                enabledFlows.AddRange(
                    customizations.Workflows.Select(y => new KeyValuePair<Guid, bool>(y.WorkflowId, Convert.ToBoolean((int)y.StateCode))));
            }
        });

    return enabledFlows;
}
SetWorkflowState
/// <summary>
/// Enable or disable Dataverse workflows (flows in solutions).
/// </summary>
/// <param name="crmServiceClient">Client to work with Dataverse environment.</param>
/// <param name="workflowId">Provide id of workflow that you want to activate or deactivate</param>
/// <param name="enabled">Enable workflows => true. Disable workflows => false.</param>
public static void SetWorkflowState(CrmServiceClient crmServiceClient, Guid workflowId, bool enabled = true)
{
    Guid originallCallerId = crmServiceClient.CallerId;

    ConnectionReference connectionReference = new ConnectionReference("talxis_sharedcommondataserviceforapps_dataverse", crmServiceClient);
    if (connectionReference.AssignedBy != null && connectionReference.AssignedBy != default)
    {
        crmServiceClient.CallerId = connectionReference.AssignedBy.Id;
    }

    SetStateRequest setStateRequest = new SetStateRequest
    {
        EntityMoniker = new EntityReference(WorkflowEntityName, workflowId),
        State = enabled ? new OptionSetValue(1) : new OptionSetValue(0),
        Status = enabled ? new OptionSetValue(2) : new OptionSetValue(1)
    };
    SetStateResponse setStateResponse = (SetStateResponse)crmServiceClient.Execute(setStateRequest);

    crmServiceClient.CallerId = originallCallerId;
}
The trickiest part was how to get the connection owner, when you do not have access to Power Apps Administration APIs from the CrmSvc client. We started with Modified By attribute of the connectionreference, but the issue there is that with each solution upgrade, the Modified By changes back to the application user (user performing the import of the solution). Another idea was to add Assigned By lookup to systemuser to connectionreference entity, but this entity is not customizable. The solution we are using now is far from perfect, but works as required:
- Custom entity Connection Reference Assignment was created
- Synchronous workflow was added
- Triggered by a create or an update operation of
connectionreference - If there is
connectionidattribute filled, the workflow creates Connection Reference Assignment - This record contains the connection reference name, owner of the connection and date of the change
- Our custom class has getters for these properties as seen in the code snippet
- Triggered by a create or an update operation of
Custom Connectors Are Returning ‘Unauthorized’
If you are using OAuth 2.0 in your custom connector, then your custom connectors might return unauthorized after the solution upgrade of the connector. For some reason, the upgrade deletes clientId and clientSecret parameters from your {customConnectorName}_connectionparameters.json file and then the connector cannot get a valid token.
This may be fixed by the platform team already, but if you are experiencing this issue, use environment variables for these values instead.
Sample {customConnectorName}_connectionparameters.json
{
    "token": {
        "type": "oauthSetting",
        "oAuthSettings": {
            "identityProvider": "aad",
            "clientId": "@environmentVariables(\"talxis_connectors_datafeed_clientid\")",
            "clientSecret": "@environmentVariables(\"talxis_connectors_datafeed_clientsecret\")",
            "scopes": [],
            "redirectMode": "Global",
            "redirectUrl": "https://global.consent.azure-apim.net/redirect",
            "properties": {
                "IsFirstParty": "False",
                "AzureActiveDirectoryResourceId": "@environmentVariables(\"talxis_connectors_datafeed_resourceuri\")"
            },
            "customParameters": {
                "loginUri": {
                    "value": "https://login.windows.net"
                },
                "tenantId": {
                    "value": "common"
                },
                "resourceUri": {
                    "value": "@environmentVariables(\"talxis_connectors_datafeed_resourceuri\")"
                }
            }
        }
    },
    "token:clientId": {
        "type": "string",
        "uiDefinition": {
            "displayName": "Client ID",
            "description": "Client (or Application) ID of the Azure Active Directory application.",
            "constraints": {
                "required": "false",
                "hidden": "true"
            }
        }
    },
    "token:clientSecret": {
        "type": "securestring",
        "uiDefinition": {
            "displayName": "Client Secret",
            "description": "Client secret of the Azure Active Directory application.",
            "constraints": {
                "required": "false",
                "hidden": "true"
            }
        }
    },
    "token:TenantId": {
        "type": "string",
        "metadata": {
            "sourceType": "AzureActiveDirectoryTenant"
        },
        "uiDefinition": {
            "displayName": "Tenant",
            "description": "The tenant ID of for the Azure Active Directory application",
            "constraints": {
                "required": "false",
                "hidden": "true"
            }
        }
    },
    "token:resourceUri": {
        "type": "string",
        "uiDefinition": {
            "displayName": "ResourceUri",
            "description": "The resource you are requesting authorization to use.",
            "constraints": {
                "required": "false",
                "hidden": "true"
            }
        }
    },
    "token:grantType": {
        "type": "string",
        "allowedValues": [
            {
                "value": "code"
            },
            {
                "value": "client_credentials"
            }
        ],
        "uiDefinition": {
            "displayName": "Grant Type",
            "description": "Grant type",
            "constraints": {
                "required": "false",
                "hidden": "true",
                "allowedValues": [
                    {
                        "text": "Code",
                        "value": "code"
                    },
                    {
                        "text": "Client Credentials",
                        "value": "client_credentials"
                    }
                ]
            }
        }
    }
}
To submit comments, go to GitHub Discussions.